Git walkthrough
Introduction
Dynamics 365 Finance and Dynamics 365 Supply Chain Management projects have historically deployed with Team Foundation Version Control (TFVC) as the default repository technology. Given the growing industry preference toward Git and tool requirements, the ISE team prototyped a Git repository setup which was then refined by Microsoft's Customer Success organization. Below you can find steps for setting up development environments to enable version control with Git, creating a build and release pipeline in Azure DevOps using the Git repository, and migrating from TFVC to Git. Please note that these steps are targeted toward working with a Git repository in Azure DevOps (as opposed to GitHub, which is technically possible but not covered in this guide).
Prerequisites
- Basic knowledge of the X++ source file directory structure on a developer machine is required to correctly locate and move the relevant models and projects.
- Basic knowledge of Git is strongly recommended, as it will add context to the steps outlined in this document.
Initial setup
If you want to follow the structure as shown in the picture below, you will have to work with Symbolic links and create the Git repository with the setup as described in the Repository structure section of the Git-based CI Pipeline guidance. Stop at Clone the repo under Set up the Git repository), the steps after that are for the development environment.
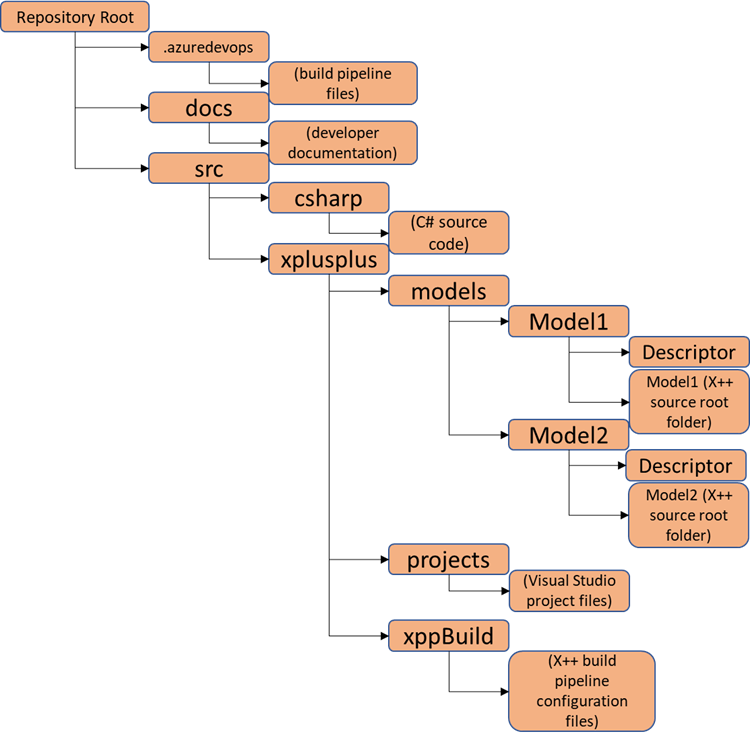
To base your repository's structure on the existing folder structure within a dev environment's AosService\PackagesLocalDirectory directory, follow the steps from Using Git in PackagesLocalDirectory | Atomic AX to setup a development environment. For convenience, information from the page is copied below along with some augmentation; it can be found in the sections named Without symbolic links.
Set up a development environment
Visual Studio
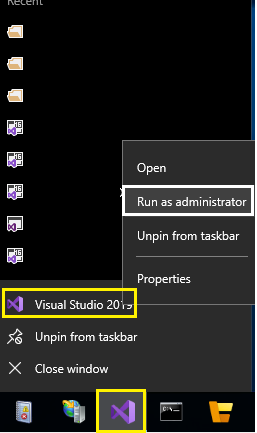
First, Open Visual Studio as an Administrator by right-clicking on the Visual Studio icon in the taskbar, right-clicking on Visual Studio 2019, and selecting Run as administrator.
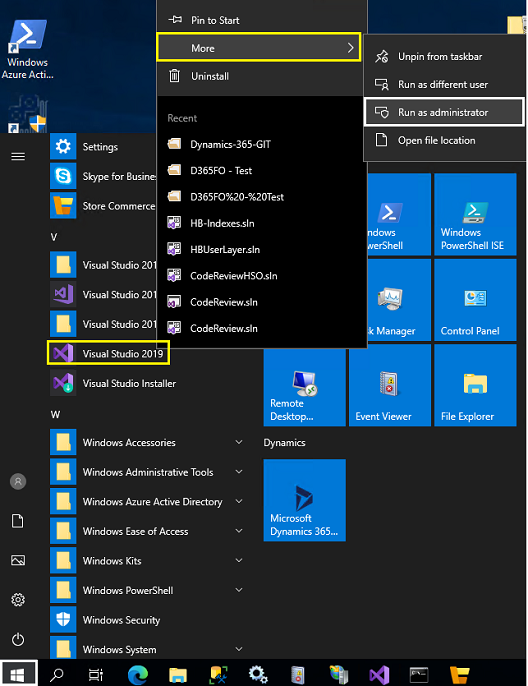
or, when Visual Studio hasn't been pinned to the taskbar, from the start menu, find and right-click Visual Studio 2019, hover over More > and select Run as administrator.
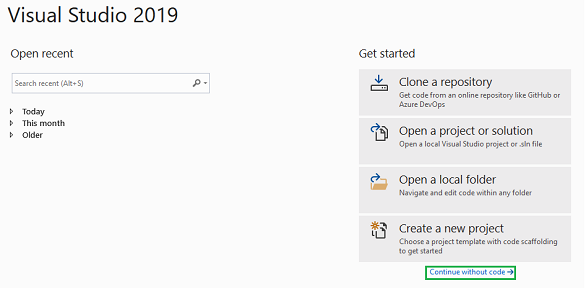
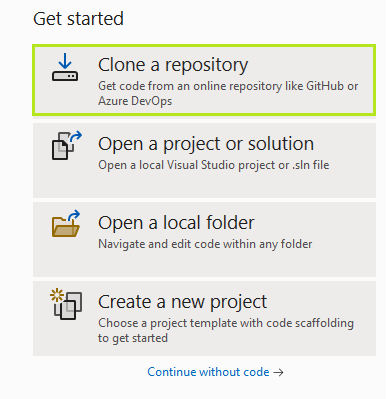
If the following dialog is displayed, select "Continue without code ->":
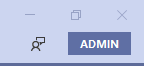
In the main screen, verify the Admin indicator is shown at the top right-hand side of the application window, if it isn't, please re-open Visual Studio as an Administrator.
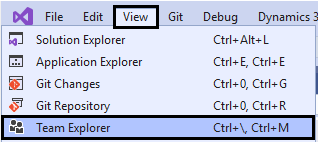
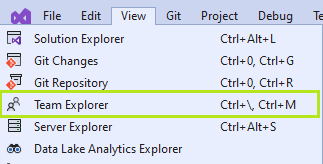
Open the Team Explorer tab by pressing Ctrl+\ and then Ctrl+M, or by clicking View in the action strip and selecting Team Explorer:
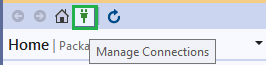
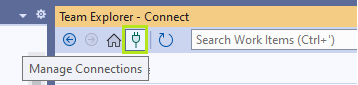
From the Team Explorer tab, click Manage Connections, click the power plug icon if you don't see Manage Connections
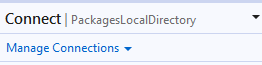
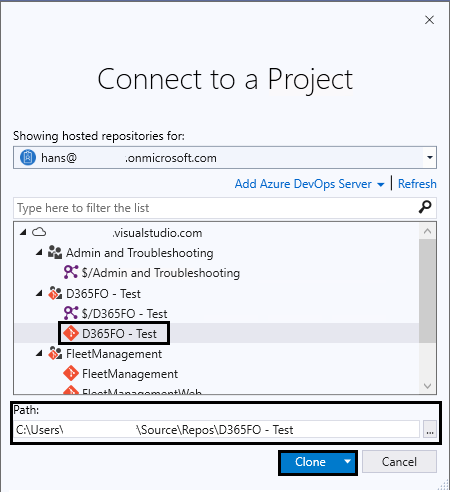
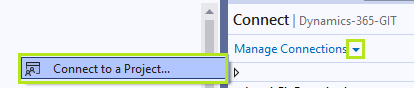
then click Connect to a Project.

In the Connect to a Project dialog, select the project and the Git repository you would like to connect to, check if the path is okay (and note it for later), and Clone it. For the remainder of this walk-through, we will use D365FO - Test as project and as repository.
This must be a Git repository.
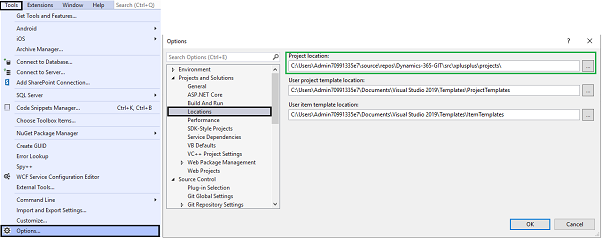
Update project location
If you want to ensure the projects end up in the Azure DevOps repository as well, update the Project location in Visual Studio through Tools > Options… Projects and Solutions > Locations.
Without symbolic links
When working without symbolic links use K:\AosService\PackagesLocalDirectory\Projects.
With symbolic links
When working with symbolic links, use C:\Users\(Your specific user folder)\source\repos\D365FO - Test \src\xplusplus\projects.
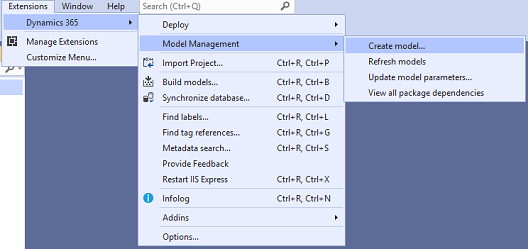
Create a new model
- Open Visual Studio as an Administrator
- Go to the Dynamics 365 > Model Management > Create model…
If you can't find Dynamics 365 in the action strip, click Extensions in the action strip, you will find Dynamics 365 as an item in the drop-down menu. For the remainder of this document, we will assume that Dynamics 365 is an option in the action strip.
- Fill the Add parameters form > click Next
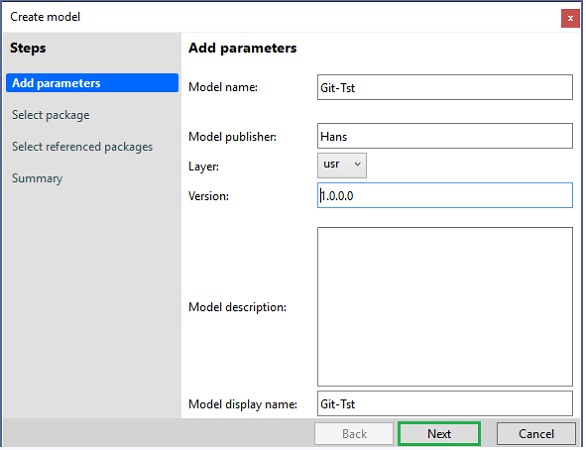
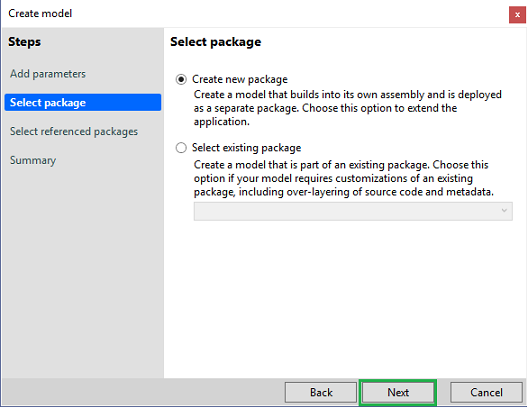
- Select Create New Package > click Next
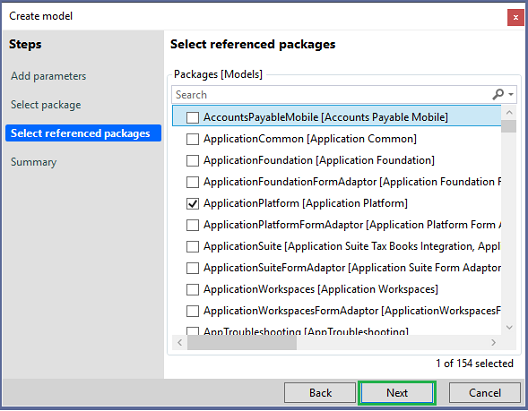
- Select packages you want reference from your model.
If you know the packages you are referencing, you can select them here. Otherwise, just accept the default. If you're using elements or functions from packages you haven't referenced, the compiler will throw an error. Find those elements and their packages in the AOT and update the new model's references with that information through Dynamics 365 > Model Management > Update model parameters….
- Click Next
- On the summary page:
- Verify the values you entered,
- Check the create new project option if you want to create project in newly created model,
- Check the make this my default model for new projects option if you want to add every new project in this model by default, and
- Click Next.
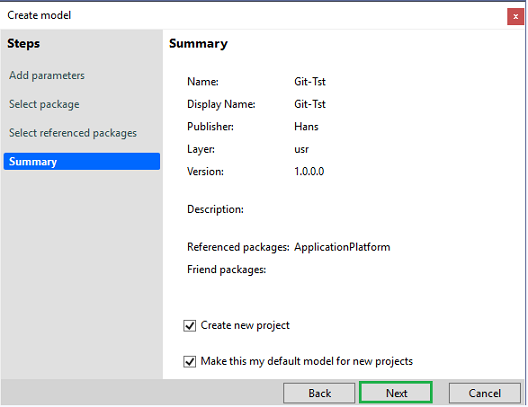
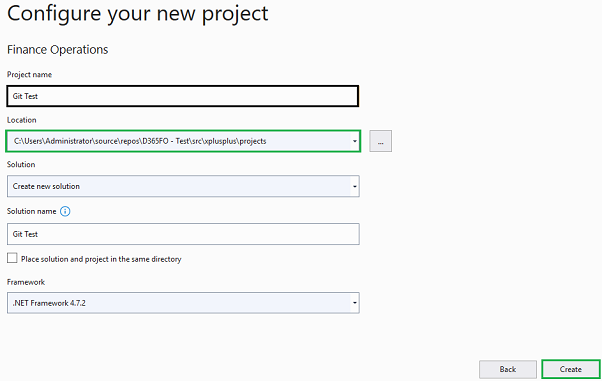
If you selected Create new project in the previous screen, the Configure your new project dialog will be displayed for a Finance Operations type project.
Enter a project name, check the location of the project, and click Create.
How to use Git with PackagesLocalDirectory
Without symbolic links
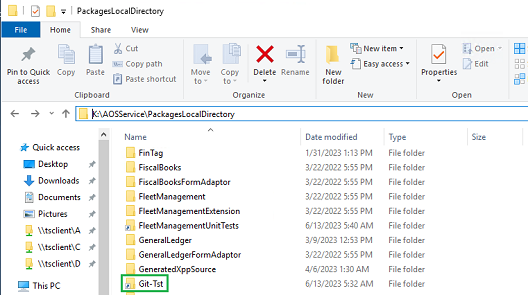
Note that without symbolic links, the repository structure as shown in the Initial setup section above won't be possible, and the repository structure will based on the existing folder structure within K:\AosService\PackagesLocalDirectory
Install Git for Windows from https://git-scm.com/download/win, accepting the defaults if you're uncertain what the installer is asking you.
Next, open PowerShell as an admin to run the following commands. Update the paths to what's appropriate for your scenario first.
Copy-Item "C:\Users\[Your specific user folder\]\source\repos\Git-Tst\.git\" "K:\AosService\PackagesLocalDirectory\" -Recurse
cd k:\AOSService\PackagesLocalDirectory\
git reset --hard
Get-Acl -Path k:\AOSService\PackagesLocalDirectory | Set-Acl -Path k:\AOSService\PackagesLocalDirectory\.git
Remove-Item "C:\\Users\[Your specific user folder\]\source\repos\Git-Tst\" -Recurse -Force -Confirm:$false
Next, update the .gitignore file in K:\AosService\PackagesLocalDirectory\ to exclude everything that isn't an extension. This may be optional depending on the state of your repository and .gitignore file.
You can use the default Visual Studio .gitignore file (from here) when there is no .gitignore file in the K:\AosService\PackagesLocalDirectory\ folder.
Update the paths for your specific scenario first and add any other desired ignores at the end of the file:
## F&O specific

## Ignore everything

/*
## But keep custom package and models for Package "Git-Tst"
## This will capture all models the descriptors for the package Git-Tst
!/Git-Tst
## bin isn't required in source control, it'll be created/updated during build if needed
Git-Tst/bin/
## resources isn't required in source control, it'll be created/updated during build if needed
Git-Tst/resources/
## XppMetadata isn't required in source control, it'll be created/updated during build if needed
Git-Tst/XppMetadata/
## All other logs or build outputs are not needed in source control
Git-Tst/*.xml
Git-Tst/*.log
Git-Tst/*.txt
Git-Tst/*.xref
Git-Tst/*.$usr

## Also keep any binary package that may be in source control for binary package "Binary Company"
## this will keep all files and folders with files in folder "Binary Company"
!/Binary Company

## keep VS Projects in PackagesLocalDirectory\Projects
!/Projects

## Also include the following files in root of PackagesLocalDirectory
!.gitignore
## YAML Pipeline for DevOps
!azure-pipelines.yml
## settings for NuGet for Pipeline
!nuget.config
## packages references for NuGet for use in Pipeline
!packages.config
Next, open Visual Studio as an Administrator again.
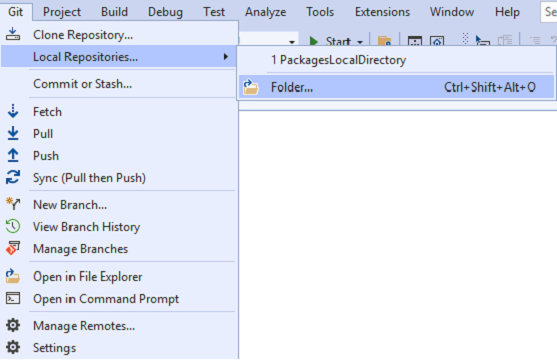
From the Git drop down menu in the action strip, add a new local repository: Git > Local Repositories > Folder….
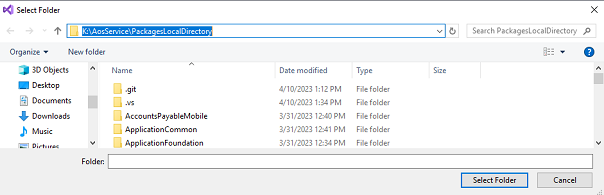
Browse to K:\AosService\PackagesLocalDirectory and click Select Folder:
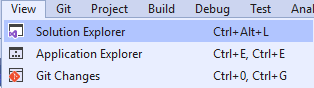
The local repository will be created, and the Solution explorer tab will be opened in 'folder view', click the Git Changes tab at the bottom of the view. If you don't see the Solution explorer tab, it can be opened from View > Solution Explorer.
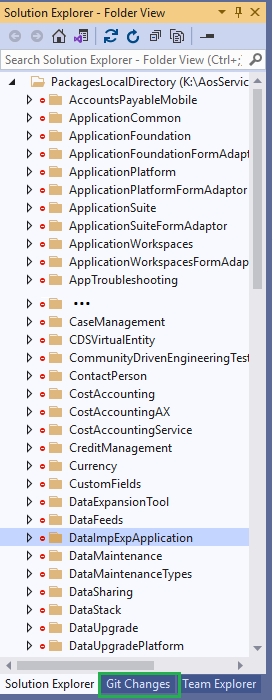
Next, we should see the changes to our .gitignore file.
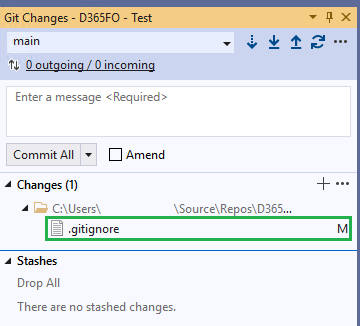
If we see the changes, that means everything worked as expected.
If you have updated the location of projects so they're stored in the AzDO repository (see Update project location above), your project files can be found in K:\AosService\PackagesLocalDirectory\Projects, otherwise they can be found in C:\Users\(Your specific user folder)\source\repos.
With symbolic links
Note that local symbolic links are necessary due to the conflicting requirements of Git preferring an empty initial repository location and the Application Object Server (AOS) requiring visibility of the pertinent custom source files to be compiled against the standard application.
- Open an elevated command prompt.
- Navigate to K:\AosService\PackagesLocalDirectory
-
For each of the customized models
-
Move the model folder to the target folder under C:\Users\(Your specific user folder)\source\repos\D365FO - Test\src\xplusplus\Models.
Note: if you are moving an existing model, the folder contents may be in-use. You will need to shut down the AOS and related services before you are allowed to move the entire folder contents.
-
Run the following commands to create symbolic links from the F&O application folder to the actual repository location:
mklink /D [Model] "C:\Users\[Your specific user folder]\source\repos\D365FO - Test\src\xplusplus\Models\[Model]"For this walkthrough, the model Git-Tst has been created, so the command line would read:
mklink /D Git-Tst "C:\Users\[Your specific user folder]\source\repos\D365FO - Test\src\xplusplus\Models\Git-Tst"
-
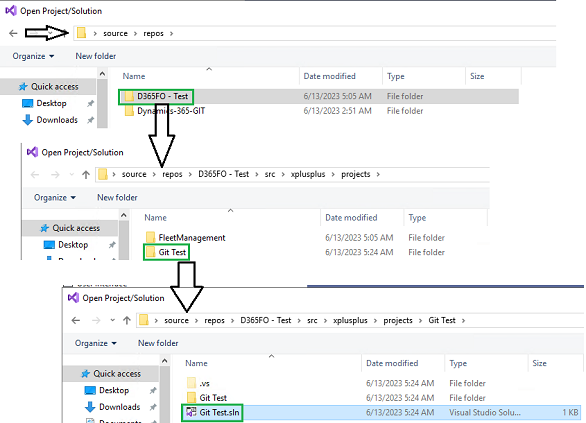
Your project file will be located in: C:\Users\[Your specific user folder]\source\repos\D365FO - Test\src\xplusplus\projects.
Complete setup of the development environment
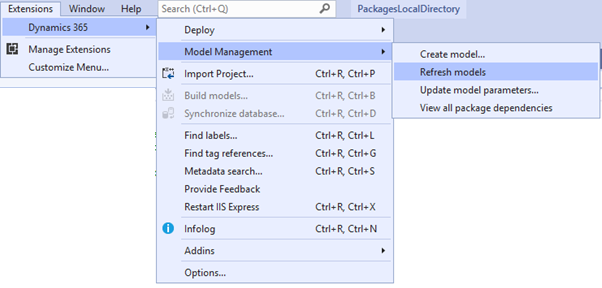
From here, we'll need to refresh models from Dynamics 365 > Model Management > Refresh models:
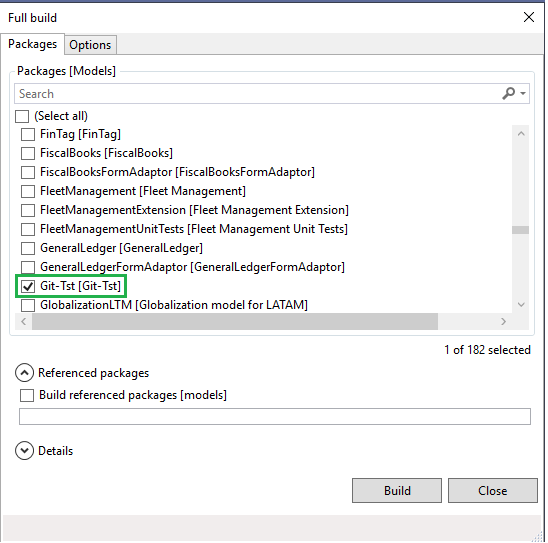
and build the Git-Tst model in this example from Dynamics 365 > Build models.

We can now develop as normal as if we were using TFVC and we shouldn't notice any major differences with the development experience.
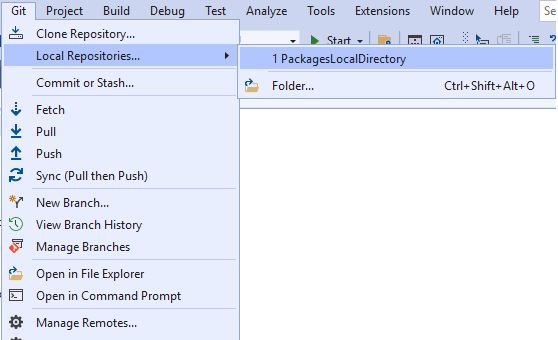
Without symbolic links
Next time you open Visual Studio, select the local repository by going to Git > Local Repositories… > 1 PackagesLocalDirectory.
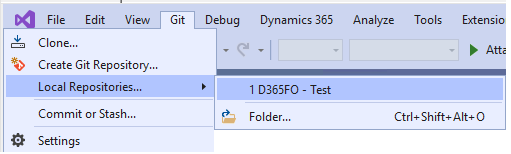
With symbolic links
Next time you open Visual Studio, select the local repository by going to Git > Local Repositories… > 1 D365FO - Test.
Create Hello World Runnable class (optional)
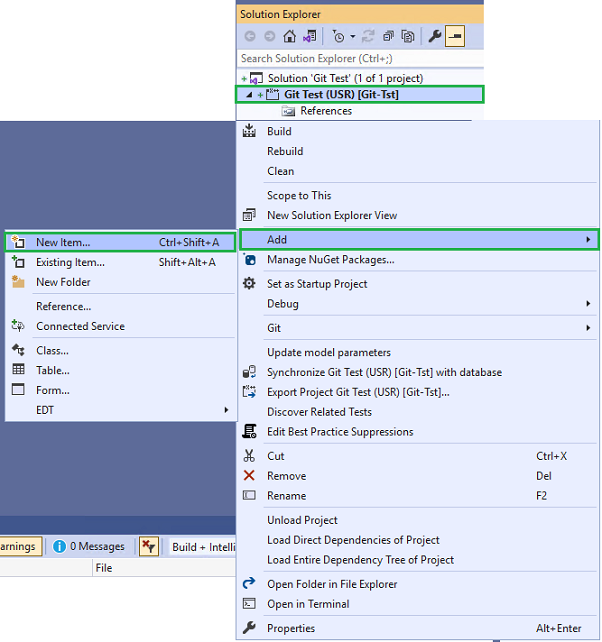
Right-click on the Project in the Solution Explorer and select Add > New item… new:
From the Dynamics 365 items template, select Runnable class, enter a name (for this walk through, we'll use HelloWorld), and click Add:

The default Runnable class will be created:
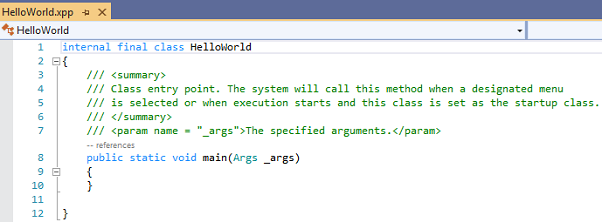
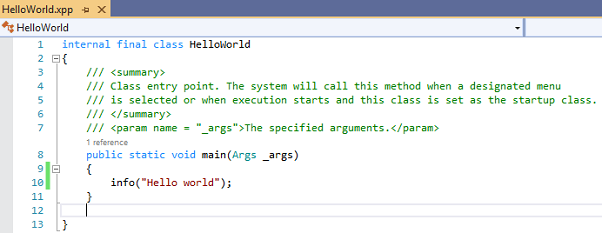
In the main method, enter the following X++ code:
And save the class (press Ctrl+S).
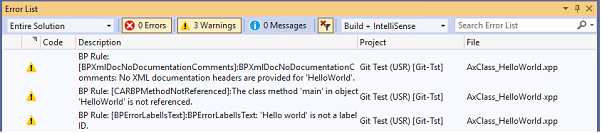
The class can be compiled by right clicking on the project and selecting Build:

There should be no Errors in the Error list screen, there will be 3 best practice warnings:
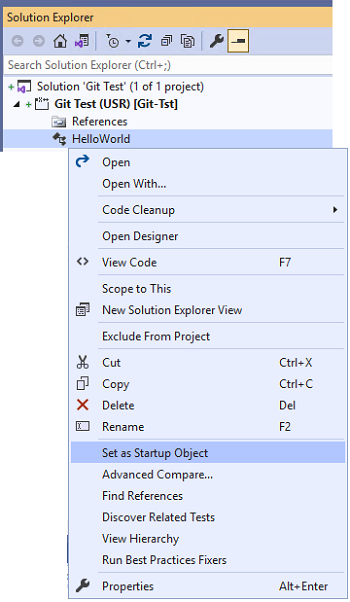
Set the class as startup object (right-click on the class and select Set as Startup Object)
Build pipeline
Follow the steps from Git-based CI Pipeline, starting from Build Pipeline Overview, copied below for convenience and updated with additional steps and explanations.
Create Azure Artifact feed
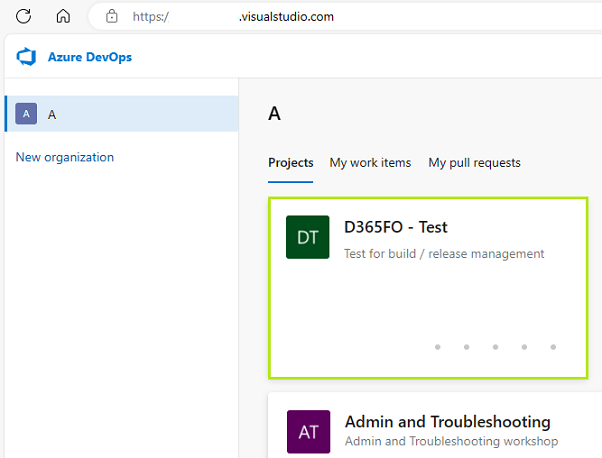
Go to your organization in Azure DevOps and select the project D365FO - Test
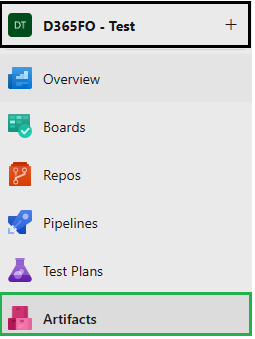
Select Artifacts in the menu on the left-hand side:
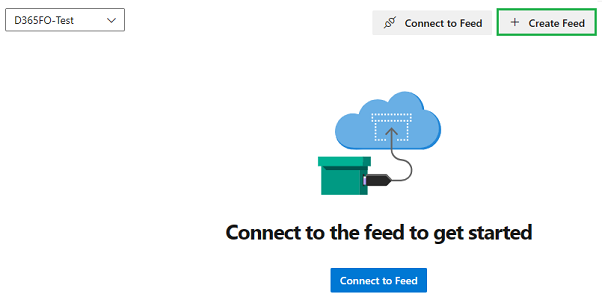
Click + Create Feed at the top of the overview page:
In the Create new feed slide in, enter XppBuildDependencies in the Name field; all the other values can be left as-is:
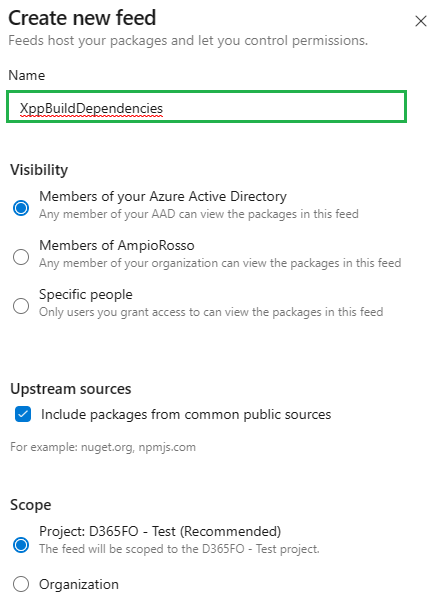
Click Create
The X++ build pipeline we created for this project uses the Microsoft-hosted agent build approach outlined here. The NuGet packages mentioned can be downloaded from the Shared asset library in LCS:
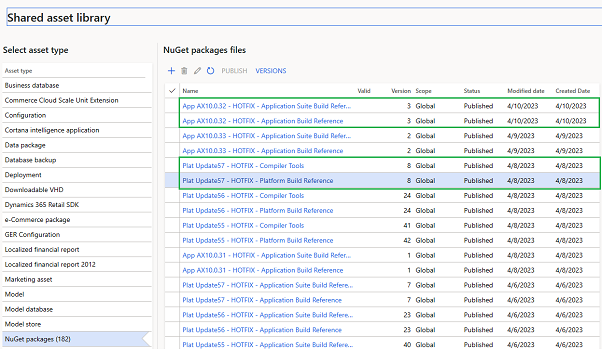
After downloading, they should be uploaded to Azure Artifacts:
nuget push ".\Microsoft.Dynamics.AX.ApplicationSuite.DevALM.BuildXpp.nupkg" -ApiKey Compiler -src "https://pkgs.dev.azure.com/[Your organization\]/D365FO - Test/_packaging/XppBuildDependencies/nuget/v3/index.json" -Timeout 900
or, if you're using an older visualstudio.com Azure DevOps address:
nuget push ".\Microsoft.Dynamics.AX.ApplicationSuite.DevALM.BuildXpp.nupkg" -ApiKey Compiler -src "https://[Your organization\].pkgs.visualstudio.com/D365FO - Test/_packaging/XppBuildDependencies/nuget/v3/index.json" -Timeout 900
Build Pipeline Scripts and Configuration
The build pipeline is based on the sample build definitions available here.
The main advantage of this approach is that it doesn't require a dedicated build VM to generate deployable packages. The main disadvantage of this approach is that it doesn't natively support automated F&O test execution.
Technically, this pipeline can be created as either a "Classic" (non-YAML) pipeline or a YAML-based scripted pipeline. For improved modularity and maintainability, this walkthrough uses the latter approach.
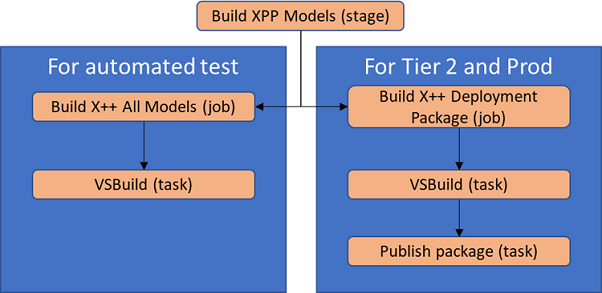
The pipeline executes two main jobs which:
- Create a production-ready package which excludes test models, and
- Create an automated test-ready package which includes all models.
The same build definition generates both packages to avoid any potential code or configuration drift between test-bound and production-bound packages.
To uniquely identify test versus non-test models in the Visual Studio solution referenced by the build pipeline, we employed Visual Studio's native solution configuration features to map production-bound models in the 'release' configuration, and test-bound models in the 'debug' configuration. More information on solution configurations can be found here. You can find a simplified build pipeline diagram below:
Build pipelines are complex, and YAML-based pipelines are dependent on repository structure, so rather than provide a step-by-step walkthrough, we're providing detailed explanations along with the YAML file contents, in dependency order, as a starting point for you to build your own pipeline.
packages.config
Description: Specifies the NuGet packages and versions used to set up both the compiler tools and system-standard source files (upon which the build pipeline depends to generate compiled X++ source code).
Note: As noted in the documentation on hosted build automation, these packages must be manually uploaded to an ADO artifact feed in your own ADO project before the references can be successfully retrieved by the build pipeline. Also, you will need to update the highlighted version numbers within your config file to match the application and platform versions you want to compile against.
Contents:
<?xml version="1.0" encoding="utf-8"?>
<packages>
    <package id="Microsoft.Dynamics.AX.Platform.DevALM.BuildXpp" version="7.0.6253.76" targetFramework="netstandard1.6" />
    <package id="Microsoft.Dynamics.AX.Application.DevALM.BuildXpp" version="10.0.1084.80" targetFramework="netstandard1.6" />
    <package id="Microsoft.Dynamics.AX.ApplicationSuite.DevALM.BuildXpp" version="10.0.1084.80" targetFramework="netstandard1.6" />
    <package id="Microsoft.Dynamics.AX.Platform.CompilerPackage" version="7.0.6253.76" targetFramework="netstandard1.6" />
</packages>
Add the packages.config file to the C:\Users\(Your specific user folder)\source\repos\D365FO - Test\src\xplusplus\xppbuild folder and Commit and Push it together with the nuget.config and azure-pipeline-xpp.yaml files to the D365FO - Test git repository of the D365FO - Test project.
nuget.config
Description: Specifies the ADO artifact feed to be used for retrieval of the packages specified in packages.config.
Note: You will need to update the target URL and optionally the key name to match your artifact feed.
Contents:
<?xml version="1.0" encoding="utf-8"?>
<configuration>
    <packageSources>
        <clear />
        <add key="XppBuildDependencies" value="https://pkgs.dev.azure.com/PROJECTCOLLECTIONNAME/PROJECTGUID/_packaging/ARTIFACTFEEDNAME/nuget/v3/index.json" \>
    </packageSources>
</configuration>
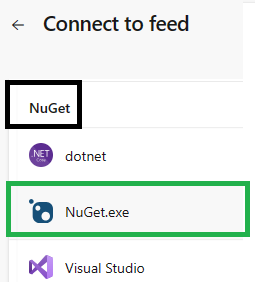
In the D365FO - Test project using the feed created earlier (see Create Azure Artifact feed) you can find the information needed for the nuget.config file by clicking the Connect to Feed button …

selecting NuGet > NuGet.exe …
and looking at the Project setup tab:
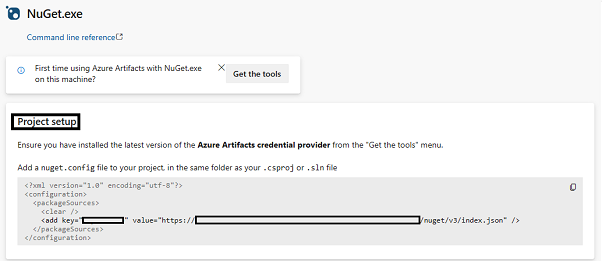
For the project and feed created in this walkthrough the add key line would read:
<add key="XppBuildDependencies" value="https://pkgs.dev.azure.com/[Your organization]/D365FO - Test/_packaging/XppBuildDependencies/nuget/v3/index.json" />
Add the nuget.config file to the C:\Users\[Your specific user folder]\source\repos\D365FO - Test\src\xplusplus\xppbuild folder and Commit and Push it together with the packages.config and azure-pipeline-xpp.yaml files to the D365FO - Test git repository of the D365FO - Test project.
Jobs-xpp-build.yaml
Description: Sets up NuGet dependencies, generates a unique model version ID for the compiled result, performs a special execution of VSBuild using the X++ compiler tools and source files specified in packages.config, records the compile logs, and optionally generates a deployable package and publishes the package to the pipeline results.
Note: We added conditions to the last two steps to separate the compilation of test models from production models. While this particular pipeline doesn't perform any additional steps in the test job, it serves as a structural example of how test execution and package generation could be separated and fully executed in a more advanced pipeline implementation.
Contents:
parameters:
  jobName: 'buildxppmodel' # Overridable name for job.
  displayName: 'Build X++ Package' # Overridable display name for job.
  xppModelSolution: '' # X++ model solution to build
  metadataPath: '' # Location of X++ model metadata
  nugetConfigsPath: '' # Location of X++ model nugets config
  configuration: 'debug' # Build configuration
  package: 'false' # Whether to package the model as an artifact

jobs:
- job: ${{ parameters.jobName }}
  displayName: ${{ parameters.displayName }}

  variables:
    AppPackage: 'Microsoft.Dynamics.AX.Application.DevALM.BuildXpp'
    AppSuitePackage: 'Microsoft.Dynamics.AX.ApplicationSuite.DevALM.BuildXpp'
    PlatPackage: 'Microsoft.Dynamics.AX.Platform.DevALM.BuildXpp'
    ToolsPackage: 'Microsoft.Dynamics.AX.Platform.CompilerPackage'
    NugetsPath: '$(Pipeline.Workspace)\NuGets'

  steps:
  - task: NuGetInstaller@0
    displayName: NuGet Install X++ Packages
    inputs:
      solution: ${{ parameters.nugetConfigsPath }}\packages.config
      nugetConfigPath: ${{ parameters.nugetConfigsPath }}\nuget.config
      restoreMode: install
      nuGetRestoreArgs: -ExcludeVersion -OutputDirectory "$(NugetsPath)"

  - task: XppUpdateModelVersion@0
    displayName: Update Model Version

  - task: VSBuild@1
      displayName: Build X++ Model
      inputs:
      configuration: ${{ parameters.configuration }}
      solution: ${{ parameters.xppModelSolution }}
      msbuildArgs: /restore /p:BuildTasksDirectory="$(NugetsPath)\$(ToolsPackage)\DevAlm\" /p:MetadataDirectory="${{ parameters.metadataPath }}" /p:FrameworkDirectory="$(NuGetsPath)\$(ToolsPackage)" /p:ReferenceFolder="$(NuGetsPath)\$(PlatPackage)\ref\net40;$(NuGetsPath)\$(AppPackage)\ref\net40;$(NuGetsPath)\$(AppSuitePackage)\ref\net40;${{ parameters.metadataPath }};$(Build.BinariesDirectory)" /p:ReferencePath="$(NuGetsPath)\$(ToolsPackage)" /p:OutputDirectory="$(Build.BinariesDirectory)"

  - task: CopyFiles@2
      displayName: 'Copy X++ Compile Log Files for Artifact Publishing'
      inputs:
        SourceFolder: $(Build.SourcesDirectory)
        Contents: |
          **\Dynamics.AX.*.xppc.*
          **\Dynamics.AX.*.labelc.*
          **\Dynamics.AX.*.reportsc.*
        TargetFolder: $(Build.ArtifactStagingDirectory)\Logs\${{parameters.configuration }}\
        condition: and(succeeded(), eq('\${{ parameters.package }}', 'true'))

  - task: XppCreatePackage@0
    displayName: Create Deployable Package
    inputs:
      XppToolsPath: $(NuGetsPath)\$(ToolsPackage)
      XppBinariesPath: $(Build.BinariesDirectory)
      XppBinariesSearch: '*'
      DeployablePackagePath: $(Build.ArtifactStagingDirectory)\AXDeployableRuntime_$(Build.BuildNumber)-${{ parameters.configuration }}.zip
    condition: and(succeeded(), eq('${{ parameters.package }}', 'true'))

  - task: PublishBuildArtifacts@1
    displayName: 'Publish Artifacts'
    inputs:
      PathtoPublish: '$(Build.ArtifactStagingDirectory)'
      condition: and(succeeded(), eq('${{ parameters.package }}', 'true'))
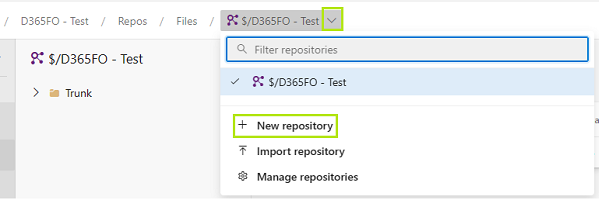
To be able to use the Azure Pipelines templates functionality (for more information, see Templates - Azure Pipelines) used in the azure-pipeline-xpp.yaml file below, create a new Git repository under the D365FO - Test project named BuildTemplates and upload the jobs-xpp-build.yaml file to its main folder.
Goto your Azure DevOps organization and open the Dynamics 365 finance and operations project:
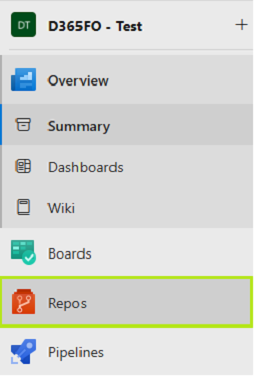
Click Repos in the left-hand side menu:
In the 'breadcrumb' path at the top of the page, click the down arrow on the default repository and click New repository:
Enter BuildTemplates as the Repository name. There is no need for a .gitignore file in this repo, so that option can be left set to None.
If you'd like to add some information about this new repository, you can leave the Add a README checked, otherwise uncheck it.
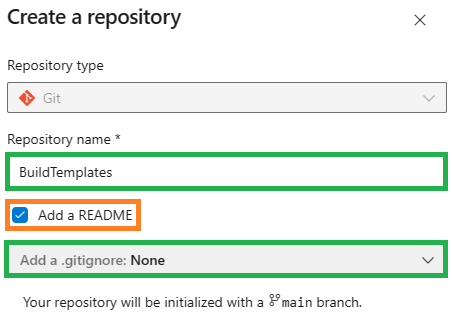
Click Create.
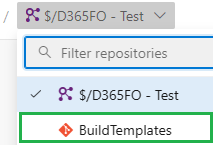
After the new repository is created, it will show up in the dropdown:
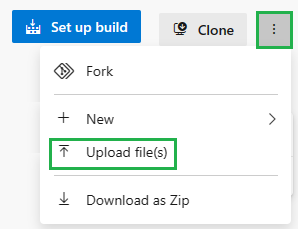
After selecting it, you can upload the jobs-xpp-build.yaml file to its main folder by clicking the three ellipsis at the top-right-hand side of the screen, and selecting Upload file(s):
In the Commit slide-in, drag and drop or browse for the jobs-xpp-build.yaml and add a Comment. The other fields can be left as-is:
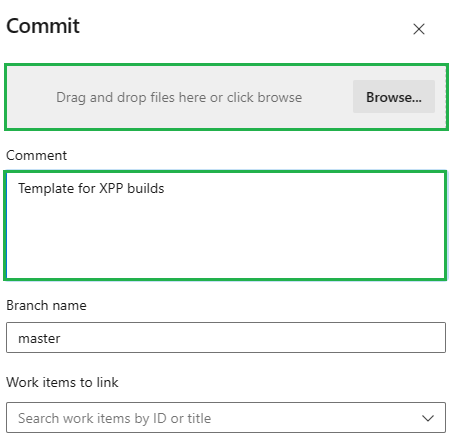
Click Commit.
azure-pipeline-xpp.yaml
Description: Triggered by changes to the target branch. Collects X++ build-relevant details such as the Visual Studio solution and the location of the X++ metadata and ADO artifact feed. Passes these details through to a job which performs the actual model compilation and, optionally, packages the results.
Contents:
## Name must be in #.#.#.# format for X++ tasks

name: \$(Date:yy.MM.dd)\$(Rev:.r)

trigger:
- master

pool:
  name: Azure Pipelines
  vmImage: 'windows-2022'
  demands:
    - msbuild
    - visualstudio

variables:
  MetadataPath: '$(Build.SourcesDirectory)\src\xplusplus\Models'
  NugetConfigsPath: '$(Build.SourcesDirectory)\src\xplusplus\XppBuild'
  XppModelSolution: 'src/xplusplus/projects/\<your solution name here>.sln'

resources:
  repositories:
    - repository: templates
      name: D365FO - Test/BuildTemplates
      type: git

stages:

- stage: buildxppmodel
  displayName: 'Build XPP Model'
  dependsOn: []
  jobs:
  - template: jobs-xpp-build.yaml@templates
    parameters:
      jobName: 'buildxppallmodels'
      displayName: 'Build X++ All Models'
      xppModelSolution: '$(XppModelSolution)'
      metadataPath: '$(MetadataPath)'
      nugetConfigsPath: '$(NugetConfigsPath)'

  - template: jobs-xpp-build.yaml@templates
    parameters:
      jobName: 'buildxppdeploymentpackage'
      displayName: 'Build X++ Deployment Package'
      xppModelSolution: '$(XppModelSolution)'
      metadataPath: '$(MetadataPath)'
      nugetConfigsPath: '$(NugetConfigsPath)'
      configuration: 'release'
      package: 'true'
Add the azure-pipeline-xpp.yaml file to the C:\Users\(Your specific user folder)\source\repos\D365FO - Test\src\.azuredevops folder and Commit and Push it together with the packages.config and nuget.config files to the D365FO - Test git repository of the D365FO - Test project.
Create the build pipeline
Please ensure you have completed the steps outlined in the Build Pipeline Scripts and Configuration step above before continuing with this step.
Goto your Azure DevOps organization and open the Dynamics 365 finance and operations project:
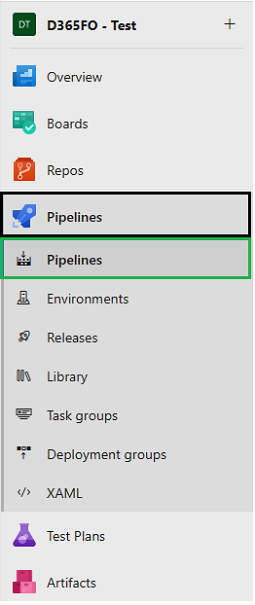
Click Pipelines > Pipelines in the left-hand side menu:
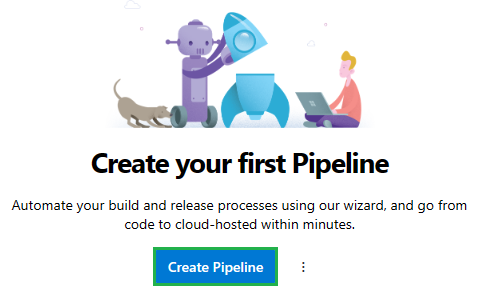
If you already created pipelines for this project before, click New pipeline on the top-right-hand side of the overview, otherwise, click Create Pipeline:
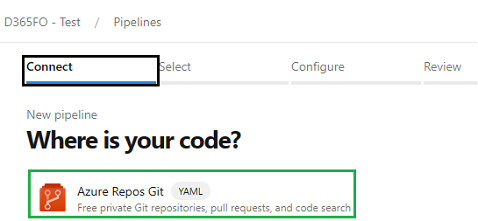
In the Connect step of the new pipeline, select Azure Repos Git:
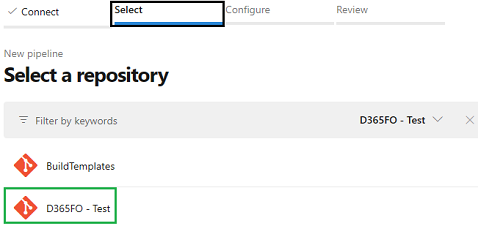
In the Select step, select D365FO - Test:
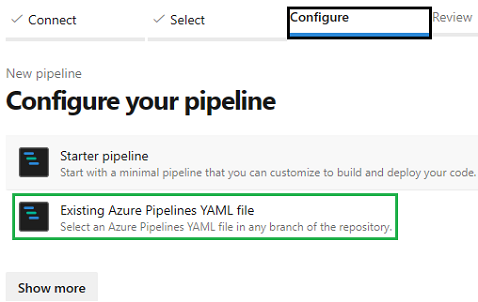
In the Configure step, select Existing Azure Pipelines YAML file:
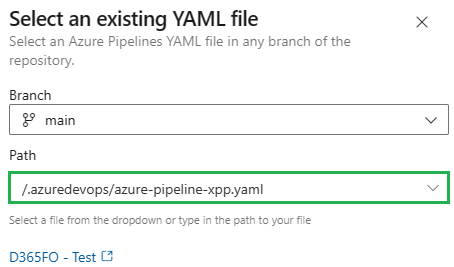
In the Select an existing YAML file slide-in, select the azure-pipeline-xpp.yaml file in the .azuredevops folder created and uploaded earlier and click Continue:
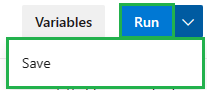
In the Review step, the pipeline yaml file will be displayed and you can Run or Save it (click the down array next to Run to get to the Save option) using the button at the top-right-hand side of the screen.
Clicking Run will create and execute the pipeline:
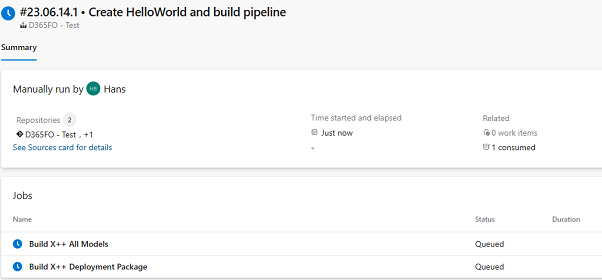
You can follow the progress of each of the jobs by clicking on the rows.
Release pipeline
All the steps to create the release pipeline have been described in this blog, the steps are shown in the right-hand menu:
Below is a shortened version of the steps:
AAD app registration
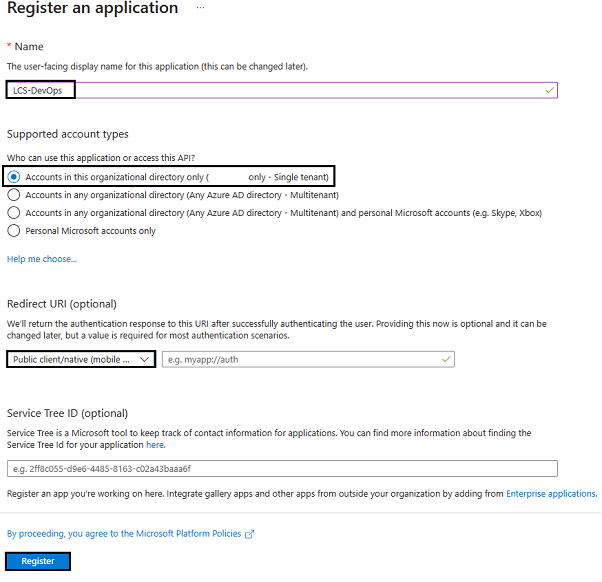
The first step to take is creating an app registration on Azure Active Directory to upload the generated deployable package to LCS.
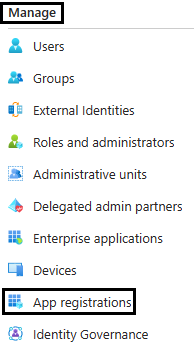
Head to the Azure portal, go to Azure Active Directory, then App Registrations under Manage:
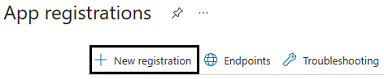
Click + New registration:
and fill in the required information, see the black boxes in the screen shot below, and click Register:
Select Manage > Authentication and set Allow public client flows to Yes, so the client secret isn't an expected parameter:
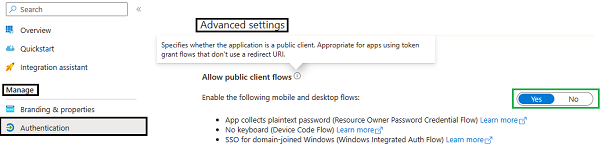
If Allow public client flows isn't set to Yes, the error (Client secret must be part of the body of the request) will be thrown when trying to upload a deployable package to LCS:

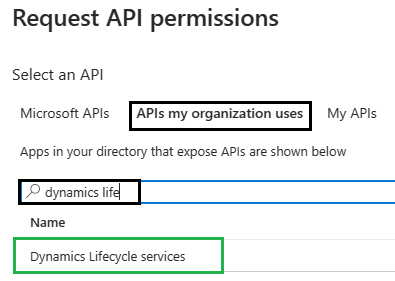
Select Manage > API permissions and click + Add a permission:
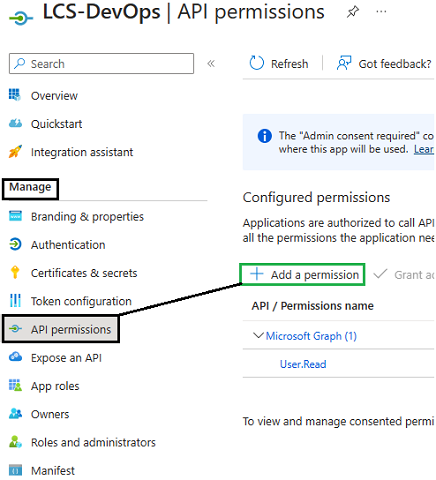
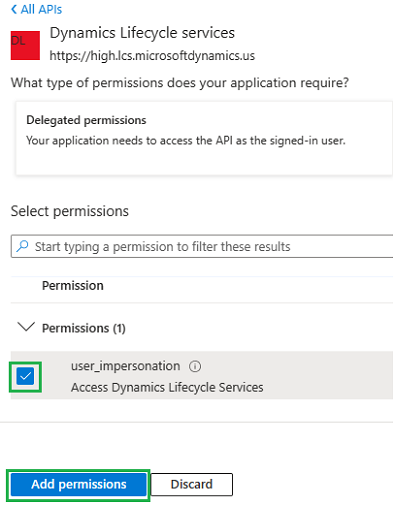
In the Request API Permissions slide in, select the APIs my organization uses tab, use the search box to limit the choices, and select Dynamics Lifecycle services:
After the selection, mark the permission, and click Add permissions:
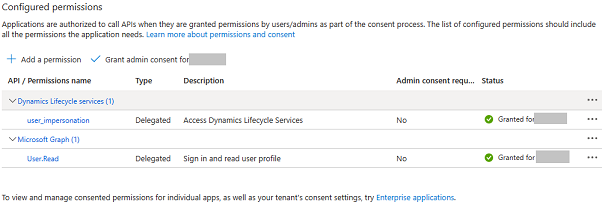
Finally, on the overview page of Manage > API permissions press the Grant admin consent for [domain] button to grant tenant-wide admin consent to the app:

and click Yes on the Grant admin consent confirmation dialog:

If this step is forgotten, the error (The user or administrator has not consented to use the application with ID '***' named '******'. Send an interactive authorization request for this user and resource) will be thrown when trying to upload a deployable package to LCS:

After this step, the API permissions overview page should look like the below, where the grey boxes show the domain:
In the Overview screen, take note of the Application (client) ID:

Create the LCS connection
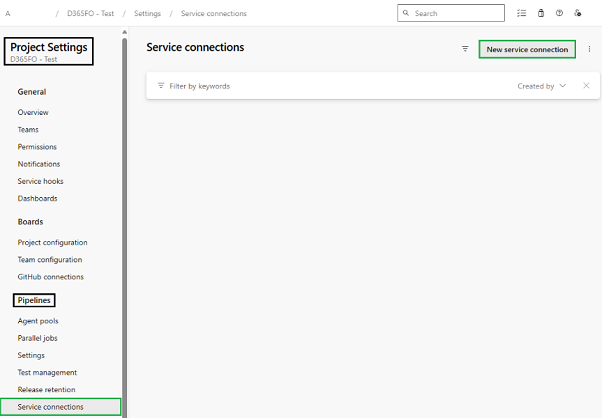
Go to your organization in Azure DevOps and select the project D365FO - Test:
Select Project settings at the bottom of the right-hand menu, and select Service connections under Pipelines. On the Service connections screen, click New service connection:
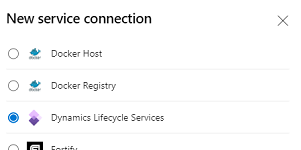
Check Dynamics Lifecycle Services and click Next:
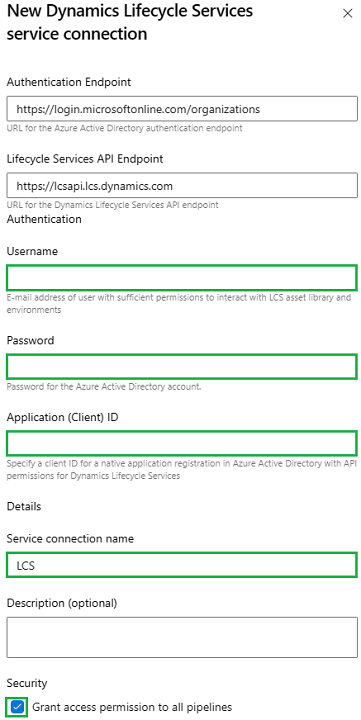
Fill in the required information for the service connection, Authentication Endpoint and Lifecycle Services API Endpoint can be left as-is.
Since admin consent has been granted in the previous step, the access credentials required are the Username and Password, of the account that will be used to upload the deployable package to the project's asset library in LCS and deploy that same package to one or more test environments.
Note: Automated deployment to a Production environment is not possible.
Also, ensure that the user used in the service connection has at least the Project team member role in LCS and has signed in at least once into LCS. If either of these two steps hasn't been taken, the error (Error creating new file asset: 'You don't have the required permissions to perform this operation.') will be thrown when uploading the software deployable package to LCS.

Use the Application ID from the AAD app creation earlier for the Application (Client) ID, make sure to check the Grant access permissions to all pipelines check box, and click Save:
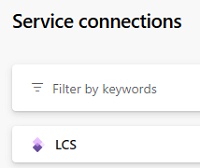
The newly created service connection which will be used in the release pipeline's tasks will show up in the overview page:
Create a release pipeline in Azure DevOps
Go to your organization in Azure DevOps and select the project D365FO - Test:
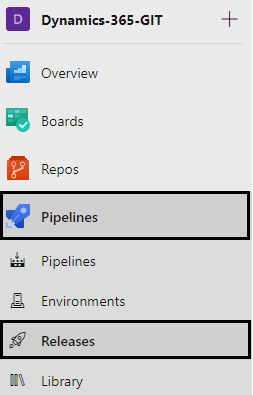
Select Pipelines > Releases from the right-hand menu:
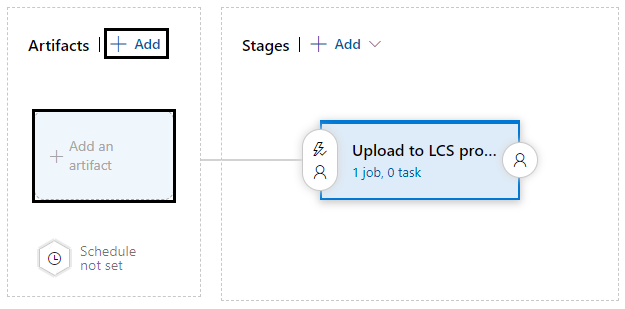
In the overview page, either select + New > + New release pipeline (when release pipelines have already been created),
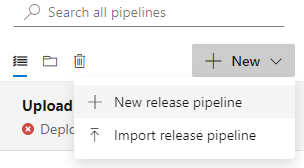
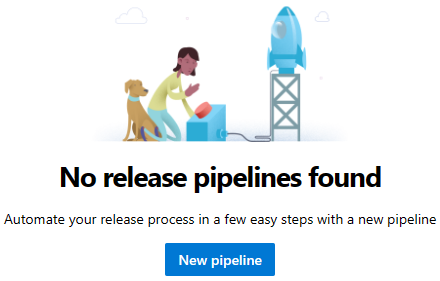
or click New pipeline at the center of the overview page:
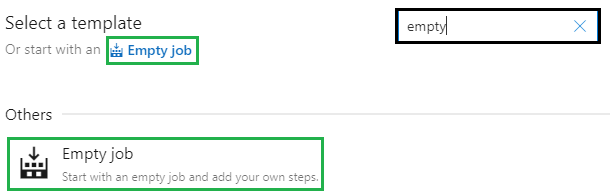
Choose Empty job from the header, or use the search box to select it from the list:
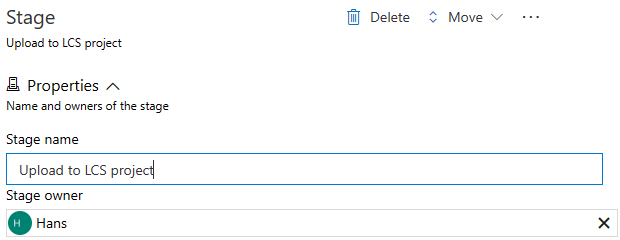
Name the stage and select an owner:
In the overview, either click + Add next to Artifacts or the +Add an artifact box:
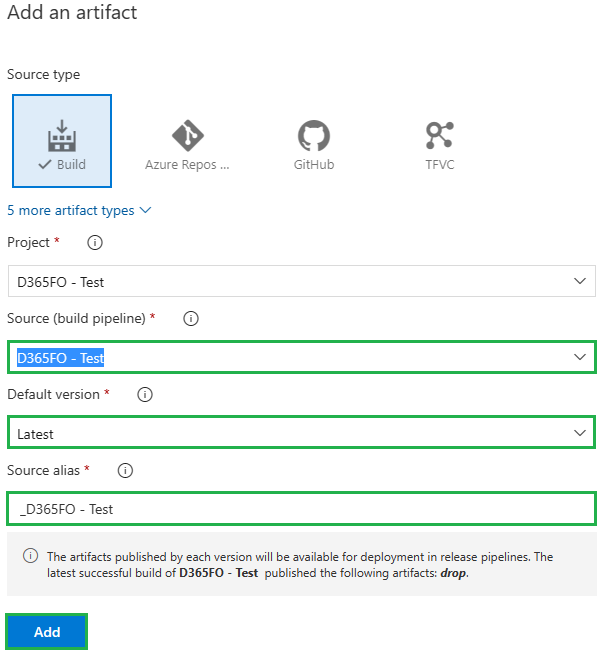
In the Add an artifact slide in, select Build as Source type, select the build pipeline created earlier for Source, and Latest for the Default version. The Source alias can usually be left as-is.
Click Add:
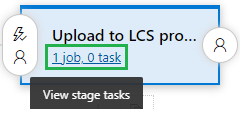
In the overview page, click the 1 job, 0 task link in the stage box:
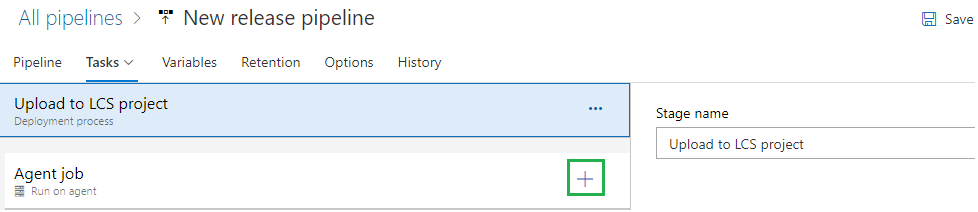
Click + on the Agent job line to find tasks that can be added to the job:
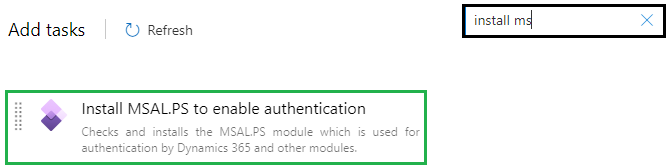
Add the Install MSAL.PS to enable authentication task:
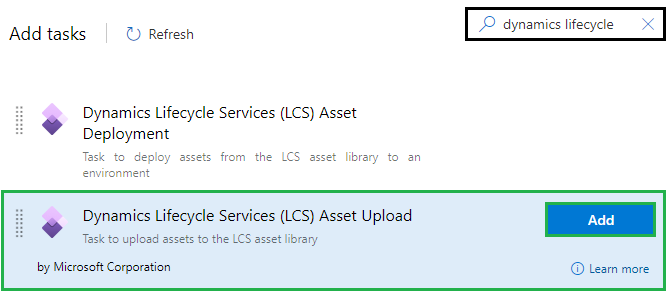
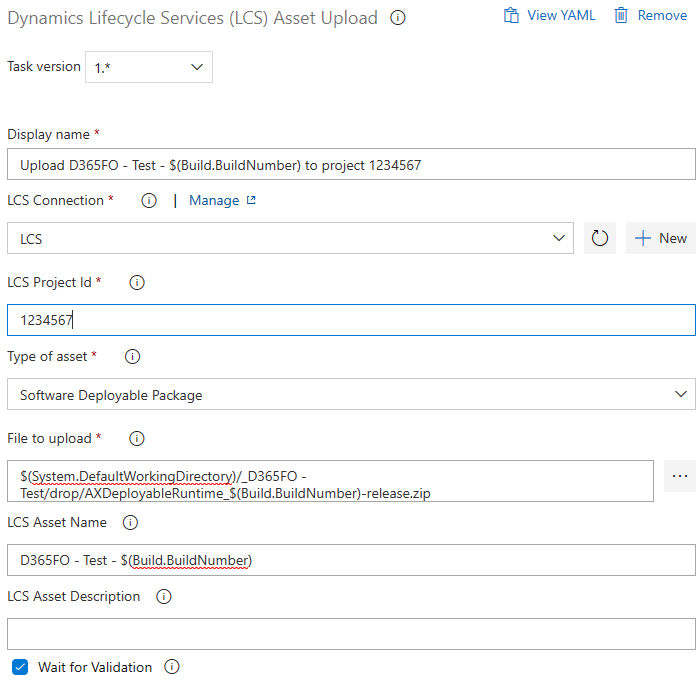
Add the Dynamics Lifecycle Services (LCS) Asset Upload task:
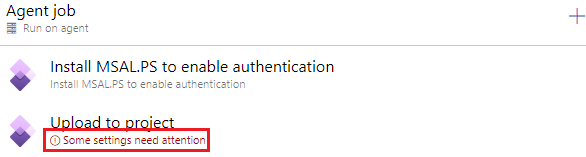
The overview page now shows the two tasks we just added, and Some settings need attention on the Upload to project task:
Click the Upload to project task:
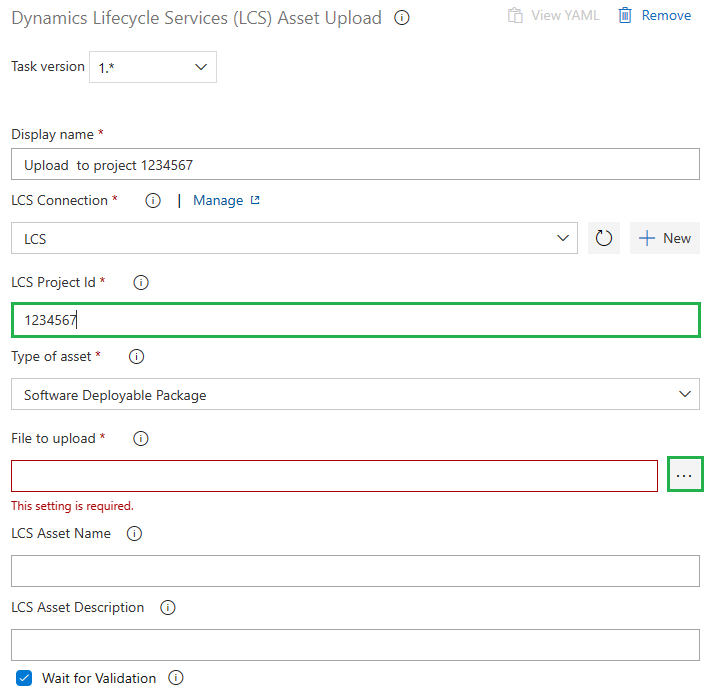
Enter the required fields:
- For LCS Connection, use the LCS service connection created earlier
- For LCS Project Id, use the ID of the LCS project where you would like to upload the deployable package to.
The Id can be retrieved from the LCS URL.

- Click the ellipses to select the File to upload and select the file ending in -release.zip under the drop > Logs folder
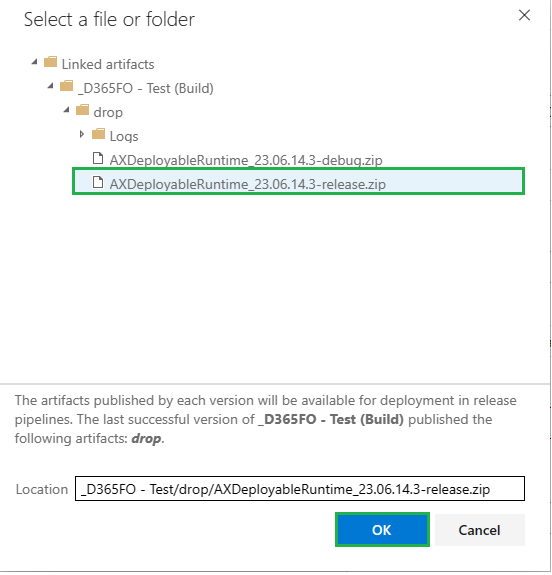
The File to upload will now always point to the deployable package of a specific build, in this case 23.06.14.3

update it by replacing the build number by $(Build.BuildNumber), so it will take the build number of the build created by the build pipeline:

- Add a name in the LCS Asset Name which will make it easy to distinguish between the different deployable packages.
In the end, the information looks something like the below:
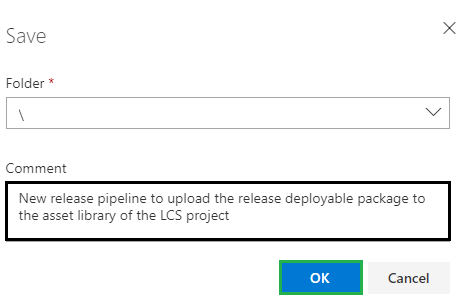
Click Save at the top of the screen to store the newly created release pipeline:

Enter a Comment about the new pipeline, leave the Folder as-is, and click OK:
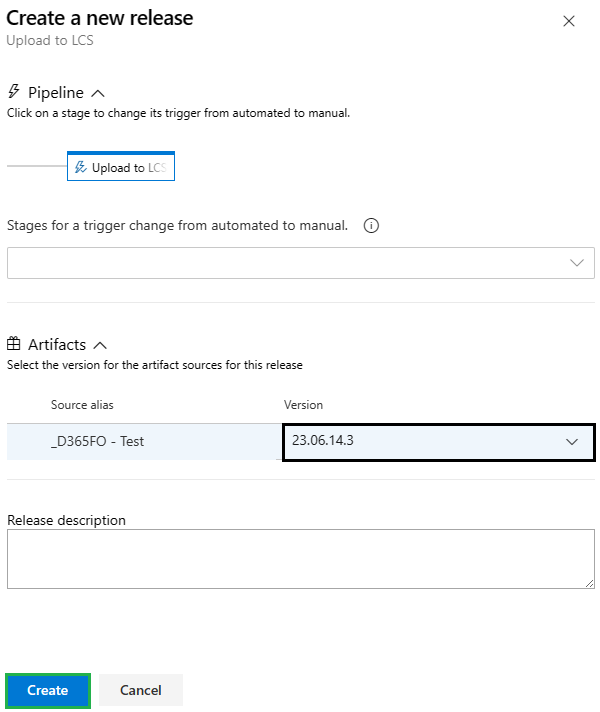
You can test the release pipeline by clicking Create release at the top of the edit screen,

or at the top of the release pipelines overview screen:

You can select a specific version in the Create a new release slide-in if needed, and click Create for the release pipeline to be queued:
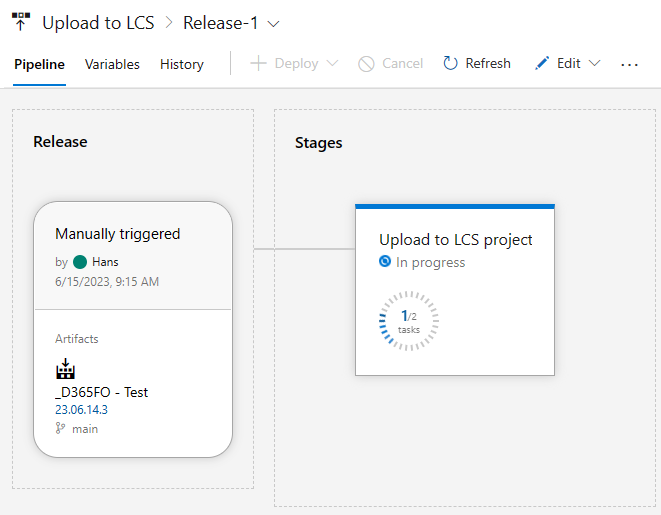
You can follow the progress by clicking the queued release in the release pipelines overview screen:
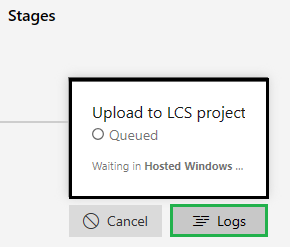
You can get more info by hovering over the Upload to LCS project tile and selecting Logs:
If the error "Error creating new file asset: 'You don't have the required permissions to perform this operation.'" occurs during the upload step, the user used in the creation of the LCS connection isn't known in the LCS project, or hasn't accepted the invitation to join yet.

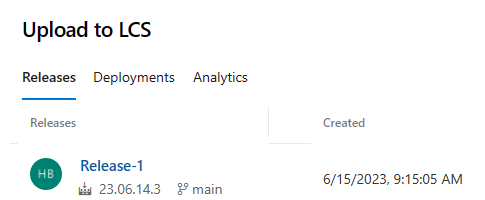
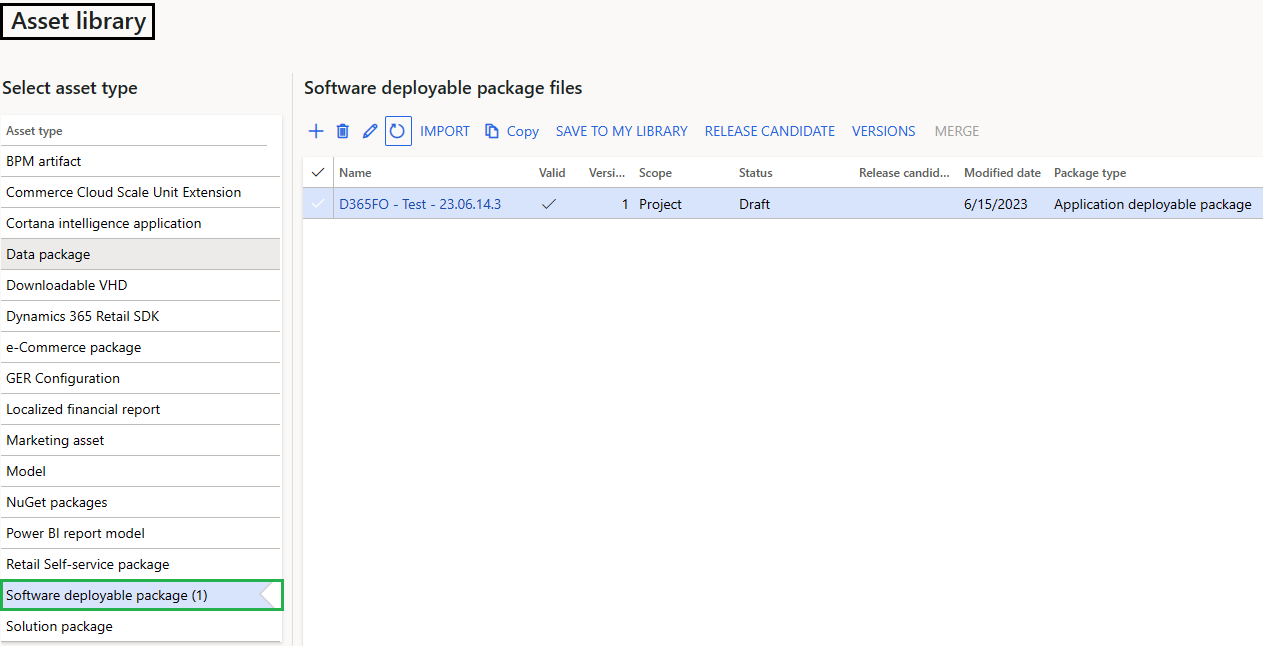
If everything works out as expected, you can find the deployable package in the Asset library of the LCS project under Software deployable package:
Deploy a package to a non-prod environment
Find the release pipeline created earlier or create a new one with the same tasks.
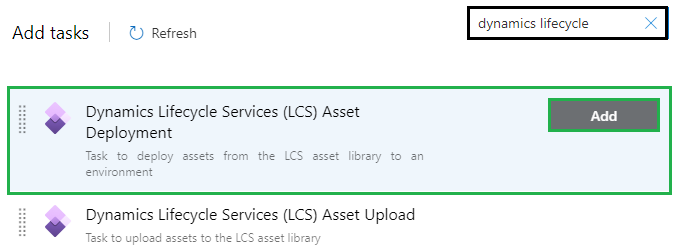
Add a new task: Dynamics Lifecycle Services (LCS) Asset Deployment:
The task will be added to the overview, with the error Some settings need attention:
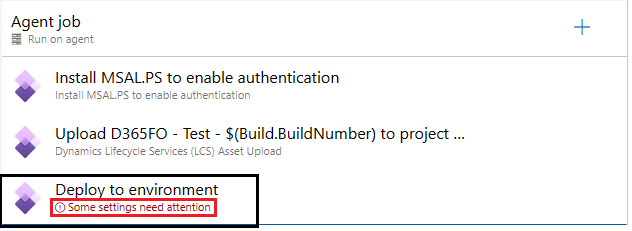
Click the newly added task to see the required information:
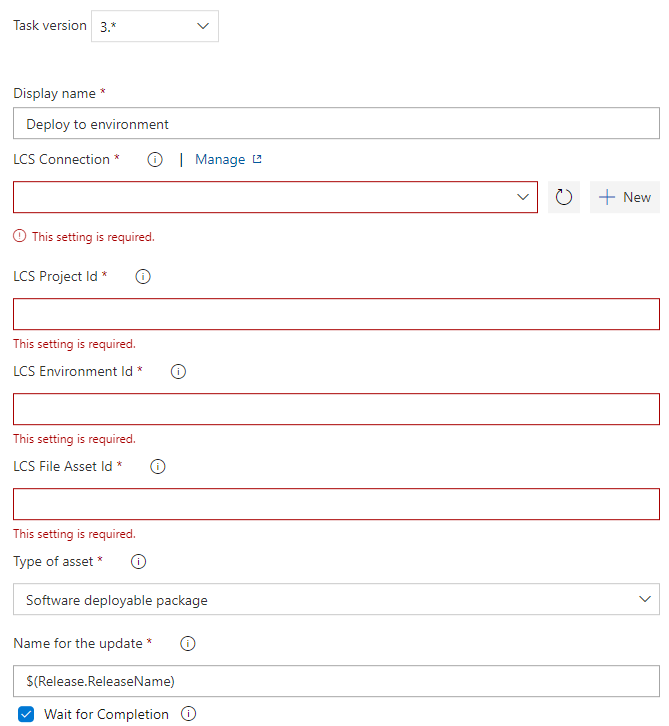
Enter the following information:
- LCS Connection: Azure DevOps service connection for LCS created earlier.
- LCS Project Id: The LCS project Id the non-prod environment you would like to update belongs to.
The Id can be retrieved from the LCS URL.
- LCS environment Id: The guid of the environment can be found on the Full details page in LCS under the Manage environment tab:

- LCS File Asset Id: Use $(FileUpload.FileAssetId)
- Name for the update: you can leave it as-is if you want to have an easy connection to the release in Azure DevOps
Migrate from TFVC to Git
Several tools are available for the migration from TFVC to Git. Two that we discuss in his guide are Azure DevOps and tfs-git.
Both have the option to migrate with and without history (a.k.a 'migrating the tip'). The difference between the two tools when migrating with history is that Azure DevOps can only migrate the history up to 180 days, while git-tfs can migrate the full history. When migrating the full history, please take into consideration that this can take a lot of time depending on how much history needs to be migrated.
It is imperative that you deeply explore the questions of what you need to preserve through the migration and how quickly you need to cut over to a new repository before you select a tool and decide on a migration strategy!
Azure DevOps
Go to your Azure DevOps organization and open the Dynamics 365 Finance and Operations project:
Click Repos in the left-hand side menu:
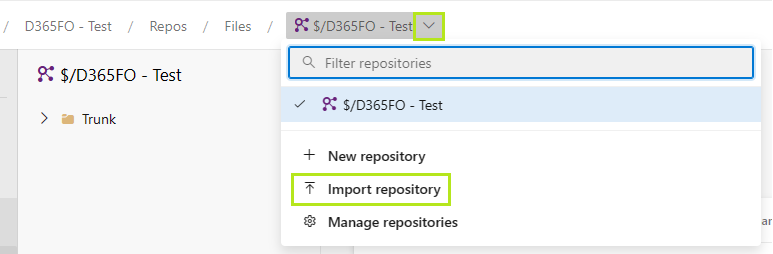
In the 'breadcrumb' path at the top of the page, click the down arrow on the default repository and click Import repository:
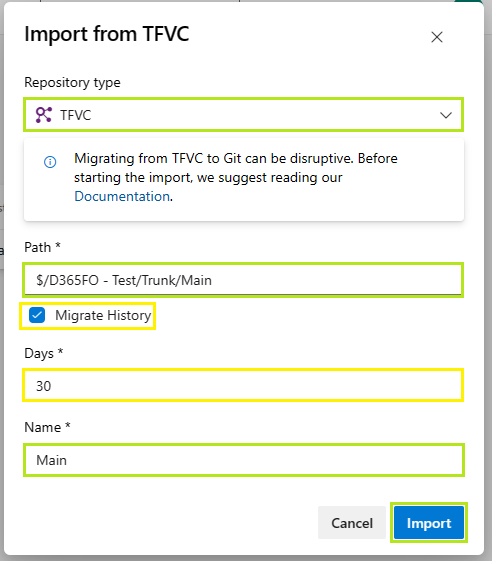
In the Import from TFVC dialog, select TFVC as the Repository type and set the path to the Dynamics 365 Finance and Operations Trunk/Main folder. This is also where you can decide to migrate the history and how many days you would like to keep (maximum 180 days). You can update the Name to something more useful (for most Git repositories, the name will be the same as the project) because a new Main branch will be created for this repository.
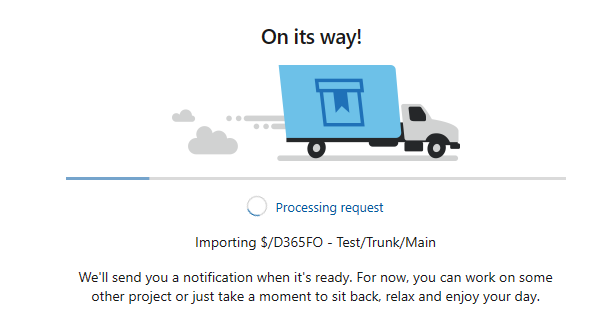
After clicking Import, the process will start:
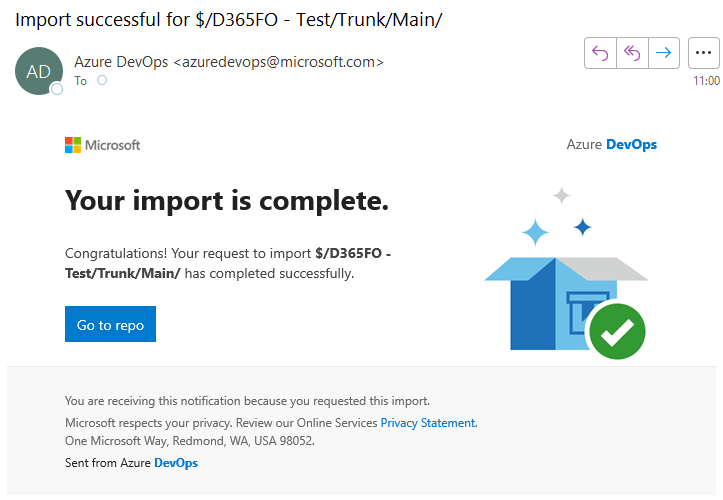
As soon as the import is done you will receive an email, similar to the one below:
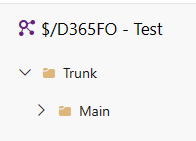
Your new Git repository is now ready for use, but if you look at it you will probably notice that the structure is different from the one used earlier in this document. For more information on importing a repository, see Import repositories from TFVC to Git.
Please check the Update the repository structure section below for more information.
Git-tfs
You can find git-tfs on Github. The Introduction page in this repository explains how to install and use git-tfs.
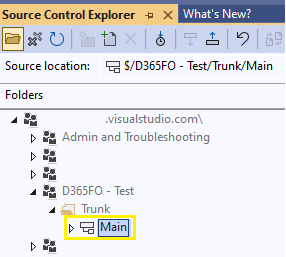
Please note that git-tfs works with branches and not with folders, so if your repository looks like the below:
, you will first have to convert the Main folder to a branch before you can use git-tfs to clone it. For this you will need to use Visual Studio, as a folder to branch conversion can't be done in the Azure DevOps web interface. When Visual Studio opens, either select Clone a repository, …
or one of the Dynamics 365 Finance and Operations projects you have been working on that are located under the repository you would like to migrate.

Open the Team explorer:
click Manage connections:
and then the downward arrow behind Manage Connections and Connect to a Project:
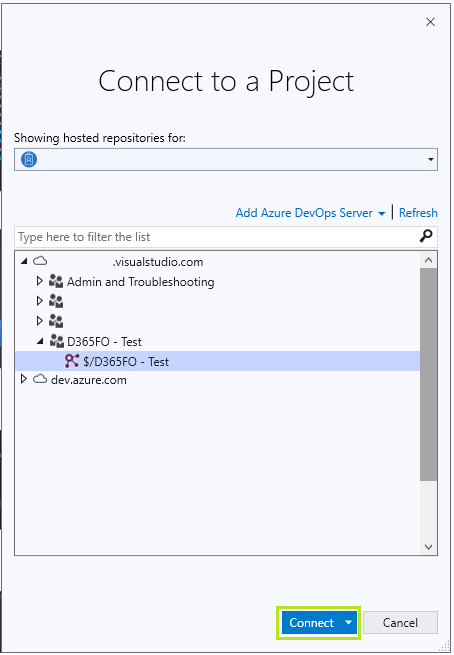
In the Connect to a Project dialog that shows up, select the project and repository you would like to migrate and click Connect:
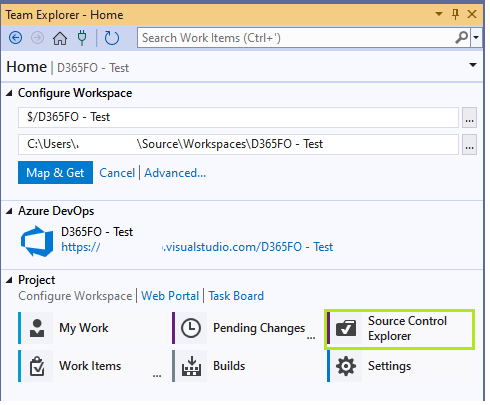
In the Team Explorer, click Source Control Explorer:
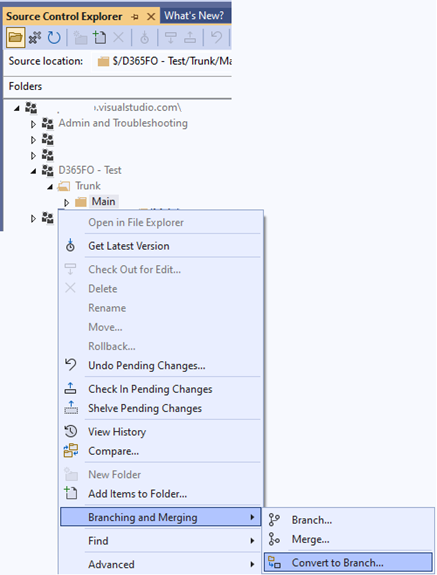
In the Source Control Explorer window, select the Main folder under the project, right-click on it and select Branching and Merging > Convert to Branch….
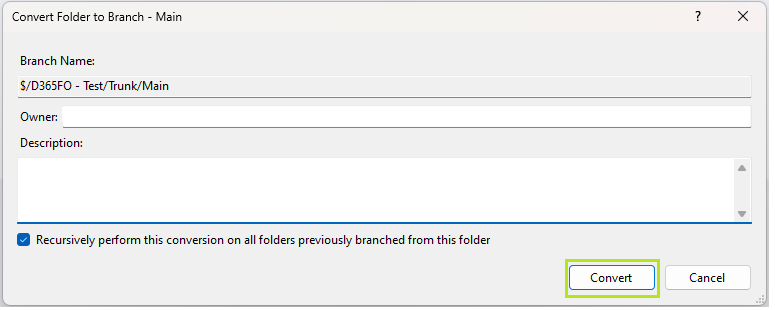
Click Convert on the Convert Folder to Branch - Main dialog:
When the conversion is done, the icon in front of Main has changed:
Goto your repos folder and create a new folder for this specific repository.
The Main branch can now be cloned by using the clone command of git-tfs in PowerShell:
With the clone command, the entire history will be migrated, which might take some time. If you just want to migrate the tip, use the quick-clone command with the same inputs:
When the process has completed you can go to the folder you created earlier and run the following command to see the history that's been migrated together with the repository:
Create a new Git repository in your Azure DevOps project. In this walk-through we will use the same name as is used for the project.
Goto your Azure DevOps organization and open the Dynamics 365 Finance and Operations project:
Click Repos in the left-hand side menu:
In the 'breadcrumb' path at the top of the page, click the down arrow on the default repository and click New repository:
Make sure you uncheck 'Add a README':
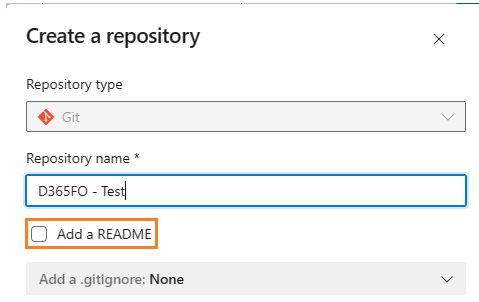
If there is mention of a branch like in the screenshot below, you haven't unchecked Add a README, or you have changed the selection for Add a .gitignore; this should be set to None.
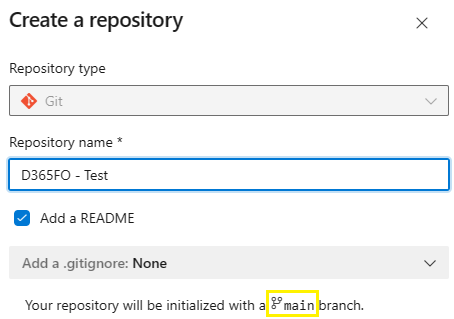
By default, git-tfs uses master as its branch (which you can check by using the git branch command). This branch will be created as soon as you push the changes to the new repository. If this name is against your company's policies, now is the time to change that by using the following command, where main is used as the new branch name:
To be able to push the changes back to Azure DevOps we're going to create a remote:
Note: If \<YourOrganization>, \<project>, or \<repository> contains spaces (like in our example), they need to be replaced by "%20" (without the quotes).
To add all the files and history to the new repository, execute the following command:
Update the repository structure
Goto your Azure DevOps organization and open the Dynamics 365 Finance and Operations project:
Click Repos in the left-hand side menu:
In the 'breadcrumb', click the down arrow on the default repository, you will find both the TFVC and the Git repositories:
By selecting them, you can see that after the migration, the directory structure of the new Git repository resembles the one from TFVC:
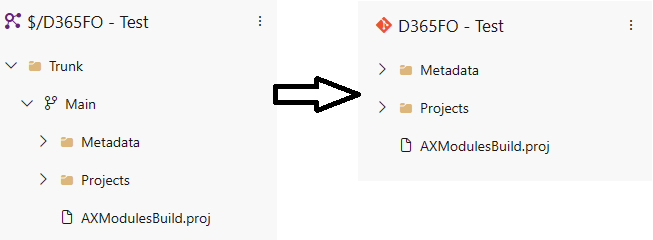
This structure is different from the one outlined in the Initial setup section above. To ensure we get the same structure, so the developers can follow the steps outlined in the Set up a development environment section, follow the steps below.
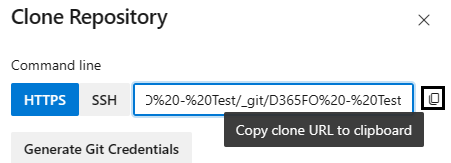
Select the Git repo, and click the Clone button on the right-hand side of the screen:

In the Clone Repository slide in, copy the HTTPS command line by clicking the Copy clone URL to clipboard icon:
On your Dynamics 365 Finance and Operations development environment, open Microsoft Visual Studio as an administrator (on 10.0.32 this is Visual Studio 2019) and Sign in with the credentials of a user that has access to the newly created Git repo.

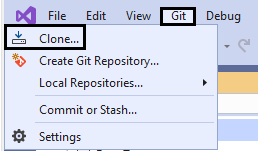
After logging on, click Git in the action strip and select Clone …:
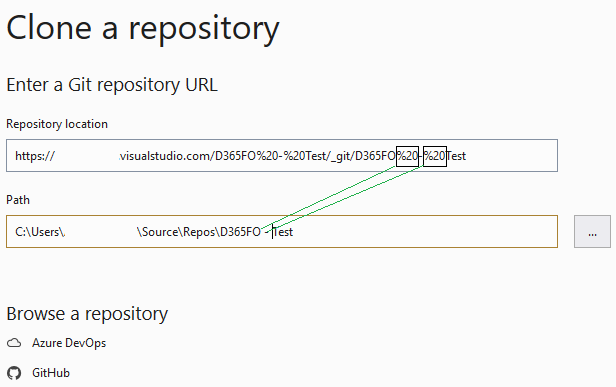
In the Clone a repository dialog, paste the clone URL copied from Azure DevOps earlier. The path where the repository will be created will be automatically filled. If the path contains %20, please replace those by a space. Please note that the path needs to be empty or non-existent.
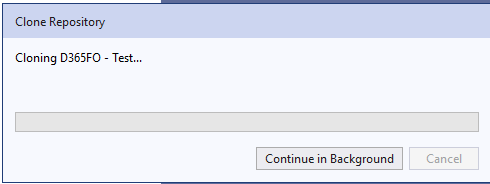
Click Clone
The below steps can be done using the Solution Explorer in Microsoft Visual Studio, but are easier to complete using Windows Explorer.
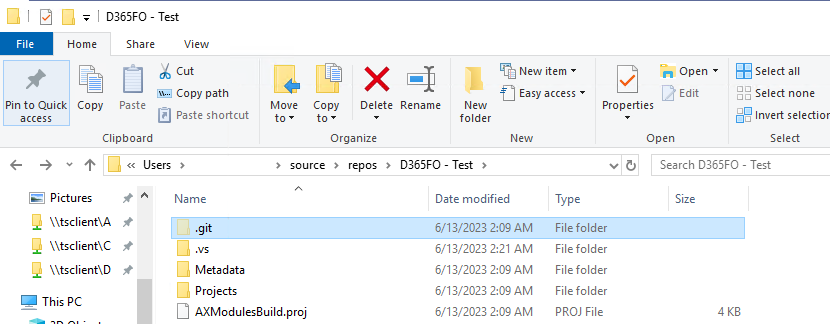
When the repository is cloned, open Windows Explorer and browse to the repository path you selected earlier (C:\Users\(User name)\Source\Repos\D365FO - Test):
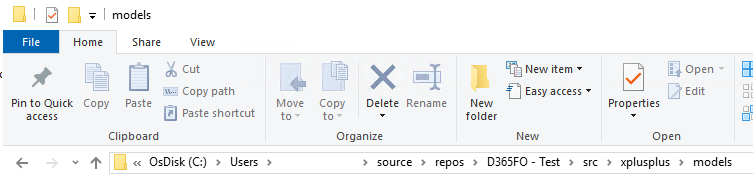
Add the folder src\xplusplus\models:
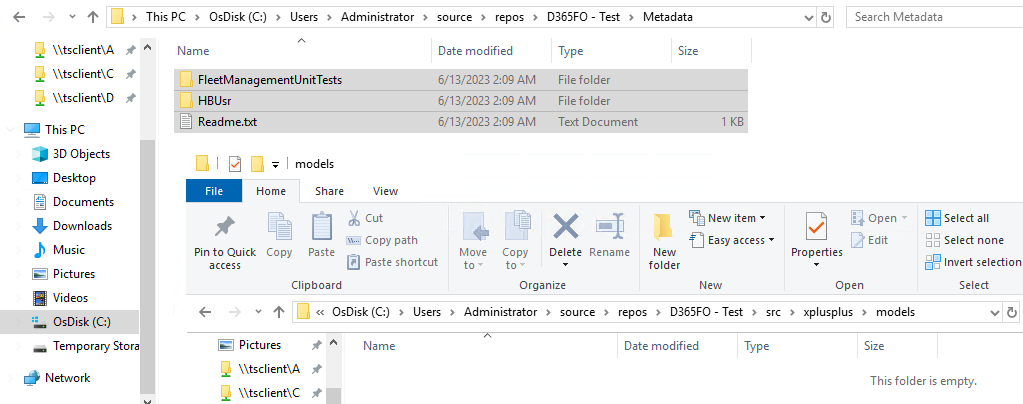
and move the contents of the Metadata folder there (two models, FleetManagementUnitTests and HBUsr will be moved):
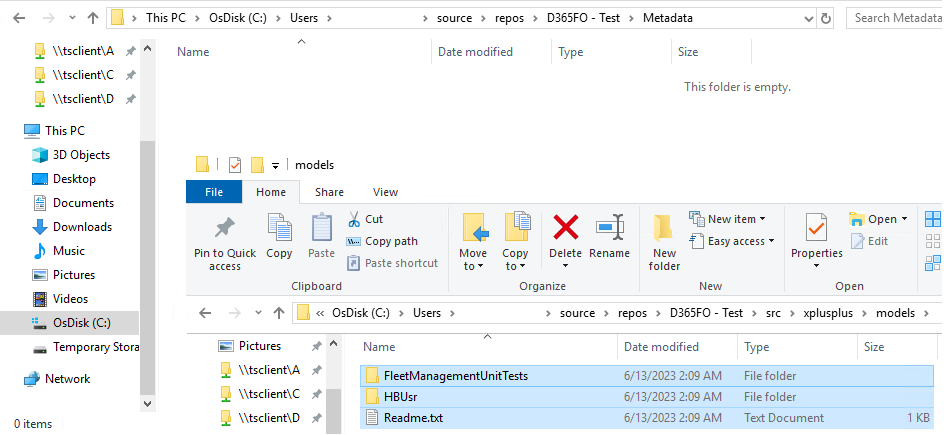
Delete the now empty Metadata folder.
Create the src\xplusplus\projects folder and move the contents of the Projects folder there:
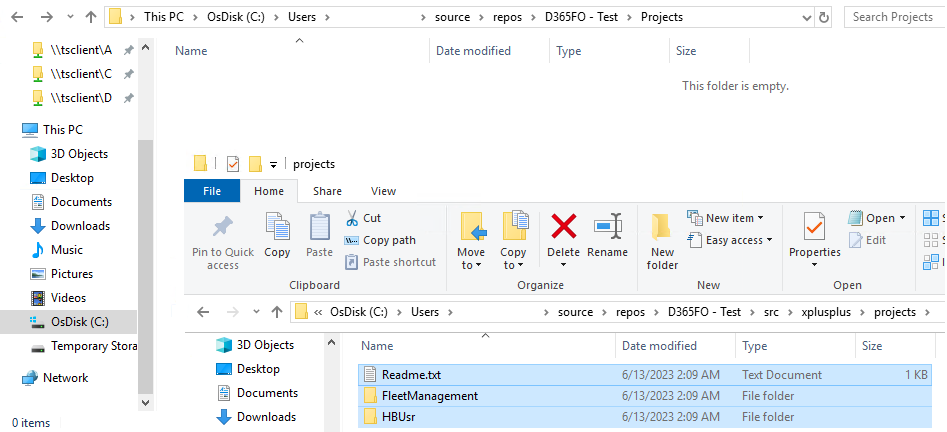
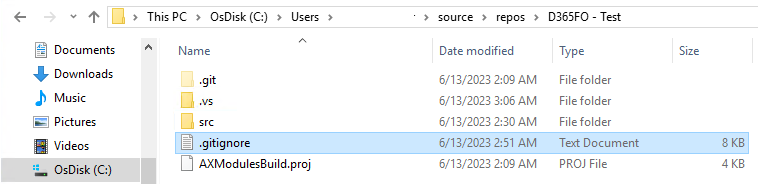
Delete the now empty Projects folder; the main folder should now look something like this:

Copy the .gitignore file from K:\AosService\PackagesLocalDirectory\ to your main repository path, or get the default Visual Studio .gitignore file from here.
Add the following Dynamics 365 finance and operations specific lines:
## F&O specific
/src/xplusplus/models/\*\*/BuildModelResult.\*
/src/xplusplus/models/\*\*/BuildProjectResult.\*
/src/xplusplus/models/\*\*/CompileLabels.\*
/src/xplusplus/models/\*\*/Resources/
/src/xplusplus/models/\*\*/Reports/
/src/xplusplus/models/\*\*/WebContent/
/src/xplusplus/models/\*\*/XppMetadata/

## Keep any binary package that may be in source control for binary package "Binary Company"
## This will keep all files and folders with files in folder "Binary Company"
!/Binary Company

## Keep VS Projects
!/Projects

## Include the following files in root of PackagesLocalDirectory
!.gitignore

## YAML Pipeline for DevOps
!.azuredevops/azure-pipelines.yml

## Settings for NuGet for Pipeline
!nuget.config

## Packages references for NuGet for use in Pipeline
!packages.config
Your main repository folder should now look something like this:
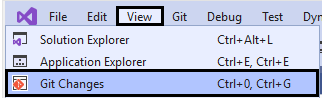
In Microsoft Visual Studio open the Git changes tab by pressing Ctrl+0 (zero) and then Ctrl+G, or clicking View in the action strip and then selecting Git changes:
The Git Changes tab will show all the changes we just made, moving files will be shown as a delete in one folder and adding in another:
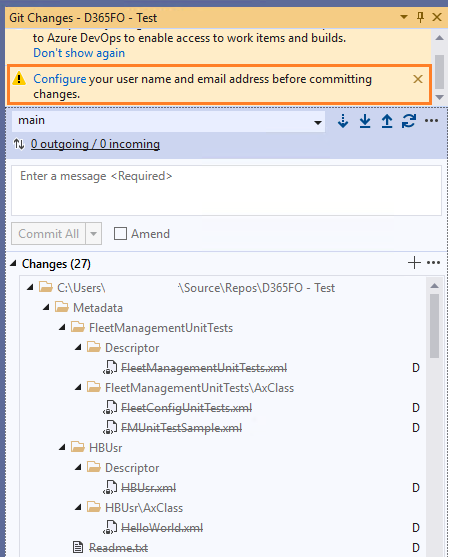
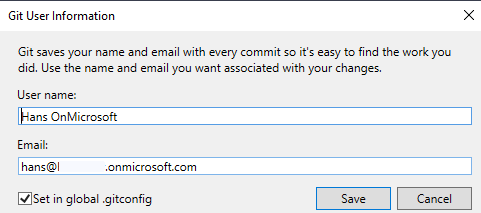
Please note the "Configure your user name and email address before committing changes." message highlighted, this is a requirement for Git. Click the word Configure for the Git User Information dialog, in most cases the pre-filled information can be kept as-is. Click Save:
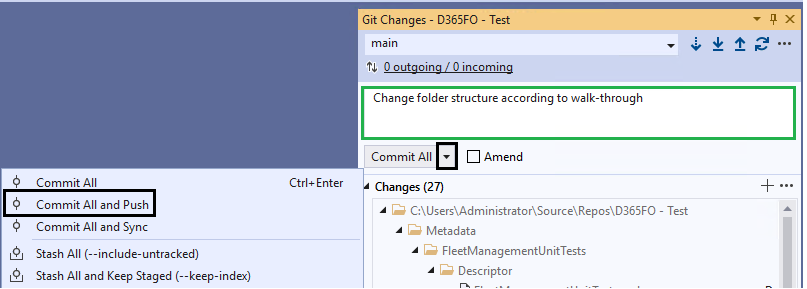
In the Git Changes tab, enter a message which describes the changes, click the down arrow next to Commit All and select Commit All and Push:
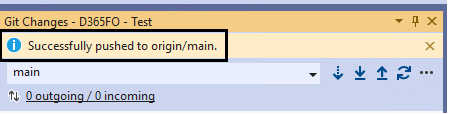
Once the changes have been committed and pushed, the Git Changes tab will display a message stating such:
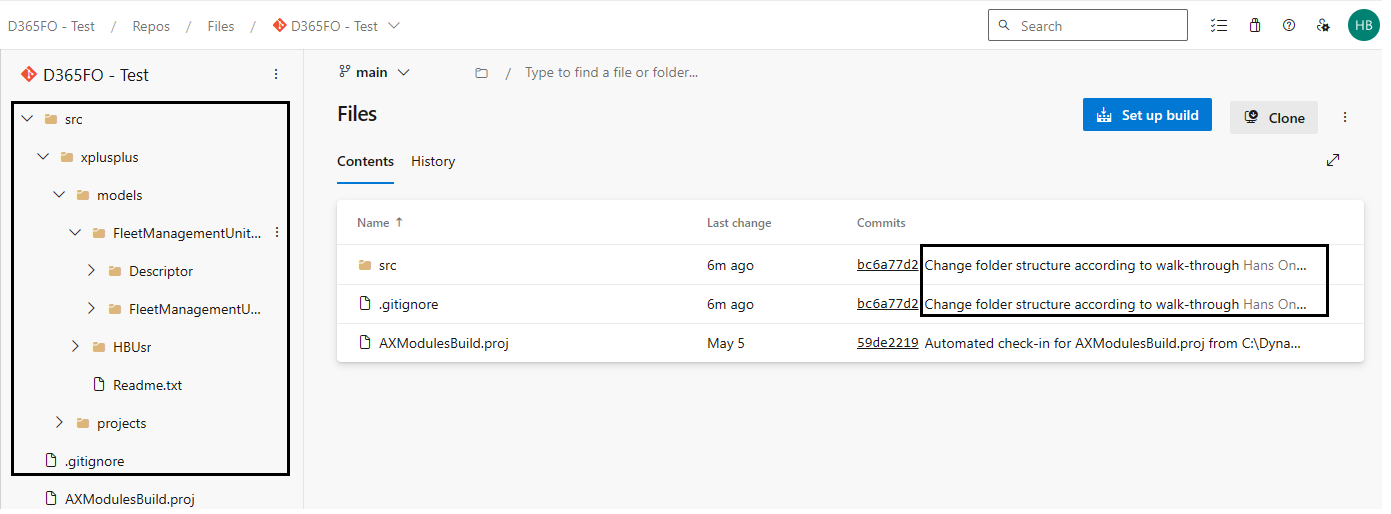
Going back to Azure DevOps and selecting the Git repo, we can now see the new folder structure and the message of the latest changes:
The repository is now ready for development tasks, and the developers can follow the steps from the Set up a development environment section above to start working with Git.
References
cspell:disable <-->- Git-based CI Pipeline
- Using Git in PackagesLocalDirectory - Atomic AX
- Release pipelines introduction - Ariste.info