Git-based CI Pipeline
Introduction
This Azure DevOps (AzDO) build pipeline was originally designed to support both X++ and a C# dependency, but it can be used for just X++ code as well.
Prerequisites
- Basic knowledge of the X++ source file directory structure on a developer machine is required to correctly locate, move, and version the relevant models.
- Basic knowledge of Git is recommended, as it will add context to the setup steps outlined in this document.
Walkthrough
Repository Structure
The pipeline in this document uses the repository structure in the diagram below. This approach prioritizes high organization at the root level of the structure. This structure is not mandatory for managing X++ in Git, and it is shown here only for context.
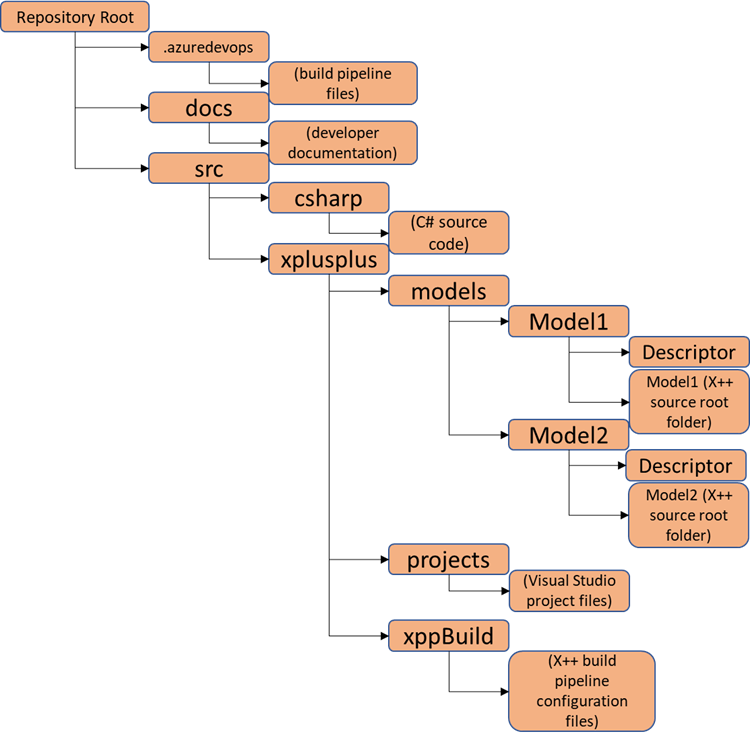 Figure 1: Sample repository structure
Set up the Git Repository
-
Create a new repo in AzDO.
a. Identify the AZDO project where you will configure the repository, then follow the instructions here to create a new repository. Stop at step b of the Clone the repo to your computer section. Repo cloning will require some special adjustments for the D365 Finance directory structure. Record the URL of your repo as specified in step 2 of the instructions. 2. Identify the X++ model that will be versioned.
a. If you are creating a new X++ model for this exercise, follow the instructions here to generate the model before moving on to the next step.
b. Note the name of the top-level directory for the model you want to version, which can usually be found under the K:\AosService\PackagesLocalDirectory location on a dev machine.
-
Clone the Repo.
Note: these instructions outline how to set up Git repo using Visual Studio 2019. There are alternate setup options available, such as using the Git command line.
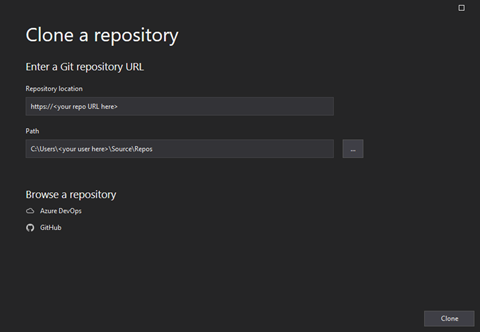 Figure 2: Clone Repository dialog in Visual Studio
a. In Visual Studio, navigate to Git > Clone.
b. In Path, enter the local destination path where you want to store the model. By default Visual Studio 2019 will select a location that looks like C:\Users\
\source\repos. Record this directory location.c. In Repository location, enter the URL of the repo you created in step 1 of these instructions. Note: if you populate the repository location after the path, the unique name of your repo should automatically be added to the directory path.
d. Select Clone option.
-
Move the source directories and set up symbolic links.
Note: We used Symbolic Links as a workaround; otherwise we have to bring the entire F&O application source code into a local git repository. Symbolic Links are in essence "deep shortcuts" between directories. A .gitignore file excluding the system-standard models would also address this issue.
a. Move the model directories. For each of the model folders identified in step 2:
1. Find the path to the top-level model directory. To find Model1 from the example repo structure above, we would usually search somewhere like K:\AosService\PackagesLocalDirectory\Model1.
2. Using either command line or File Explorer, move the model folder from K:\AosService\PackagesLocalDirectory to the target folder you created and recorded in step 3. Note: if you are moving an existing model, the folder contents may be in-use. You will need to shut down the AOS and related services before you are allowed to move the entire folder contents.
b. Set up symbolic links. Each moved model directory will need a symbolic link to point the D365 services to its new location. To create a symbolic link, open a Command Prompt in admin mode, navigate to the PackagesLocalDirectory folder, and then, for each folder you moved, enter the following command:
>mklink /D "The exact name of the model folder" "The file path to the new folder location"For example, if you used all of the defaults outlined above, the command would look something like:
>mklink /D "Model1" "C:\Users\<Your User>\source\repos\XppGitRepo"You can use File Explorer or command line to navigate to the new locations starting at the AOS folder. From there, you can validate the links manually. The model folder contents should look like they exist under the AOS folder.
Build Pipeline Overview
This X++ build pipeline uses the Microsoft-hosted agent build approach outlined here, and it is based on the sample build definitions available here.
The main advantage of this approach is that it does not require a dedicated build VM to generate deployable packages. The main disadvantage of this approach is that it does not natively support automated D365 Finance test execution.
Technically, this pipeline can be created as either a "Classic" (non-YAML) pipeline, or a YAML-based scripted pipeline; for improved modularity and maintainability, this walkthrough uses the latter approach.
The pipeline executes two main jobs which:
- Create a production-ready package that excludes test models; and
- Create an automated test-ready package that includes all models
The same build definition generates both packages to avoid any potential code or configuration drift between test-bound and production-bound packages.
To identify test versus non-test models in the Visual Studio solution referenced by the build pipeline, we employed Visual Studio’s native solution configuration features. These features map production-bound models to the ‘release’ configuration, and test-bound models to the ‘debug’ configuration. More information on solution configurations can be found here.
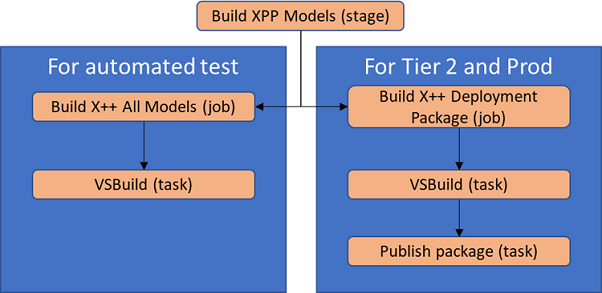 Figure 3: Simplified build pipeline diagram
Build Pipeline Scripts and Configuration
Build pipelines are complex, and YAML-based pipelines are dependent on repository structure. Rather than providing a step-by-step walkthrough, this guidance provides explanations along with the YAML file contents, in dependency order, as a starting point for building your own pipeline. Once you have a good handle on the file contents, you can create your own scripts by hand, or start with the templates:
packages.config
Description: Specifies the NuGet packages and versions used to set up the compiler tools and system-standard source files. The build pipeline depends on the settings to generate compiled X++ source code.
Note: the documentation on hosted build automation notes that the packages must be manually uploaded as AZDO artifacts before build pipeline can use the references. Also, you will need to update the highlighted version numbers within your config file to match the application and platform versions you want to compile against.
Contents:
<?xml version="1.0" encoding="utf-8"?>
<packages>
    <package id="Microsoft.Dynamics.AX.Platform.DevALM.BuildXpp" version="7.0.6253.76" targetFramework="netstandard1.6" />
    <package id="Microsoft.Dynamics.AX.Application.DevALM.BuildXpp" version="10.0.1084.80" targetFramework="netstandard1.6" />
    <package id="Microsoft.Dynamics.AX.ApplicationSuite.DevALM.BuildXpp" version="10.0.1084.80" targetFramework="netstandard1.6" />
    <package id="Microsoft.Dynamics.AX.Platform.CompilerPackage" version="7.0.6253.76" targetFramework="netstandard1.6" />
</packages>
nuget.config
Description: Specifies the AZDO artifact feed to be used for retrieval of the packages specified in packages.config. Note: You will need to update the target URL and optionally the key name to match your artifact feed.
Contents:
<?xml version="1.0" encoding="utf-8"?>
<configuration>
    <packageSources>
        <clear />
        <add key="XppBuildDependencies" value="https://pkgs.dev.azure.com/PROJECTCOLLECTIONNAME/PROJECTGUID/_packaging/ARTIFACTFEEDNAME/nuget/v3/index.json" />
    </packageSources>
</configuration>
Jobs-xpp-build.yaml
Description: The pipeline job performs a multitude of tasks:
- Sets up NuGet dependencies,
- Generates a unique model version ID for the compiled result,
- Performs a special execution of VSBuild using the X++ compiler tools and source files specified in packages.config,
- Records the compile logs, and
- Optionally generates a deployable package and publishes the package to the pipeline results.
Note: we added conditions to the last two steps to separate the compilation of test models from production models. This pipeline does not perform any extra steps in the test job. However, it serves as a structural example of how test execution and package generation could be separated and fully executed in a more advanced pipeline implementation.
Contents:
parameters:
jobName: 'buildxppmodel' # Overridable name for job.
displayName: 'Build X++ Package' # Overridable display name for job.
xppModelSolution: '' # X++ model solution to build
metadataPath: '' # Location of X++ model metadata
nugetConfigsPath: '' # Location of X++ model nugets config
configuration: 'debug' # Build configuration
package: 'false' # Whether to package the model as an artifact

jobs:
- job: ${{ parameters.jobName }}
displayName: ${{ parameters.displayName }}

variables:
    AppPackage: 'Microsoft.Dynamics.AX.Application.DevALM.BuildXpp'
    AppSuitePackage: 'Microsoft.Dynamics.AX.ApplicationSuite.DevALM.BuildXpp'
    PlatPackage: 'Microsoft.Dynamics.AX.Platform.DevALM.BuildXpp'
    ToolsPackage: 'Microsoft.Dynamics.AX.Platform.CompilerPackage'
    NugetsPath: '$(Pipeline.Workspace)\NuGets'

steps:
- task: NuGetInstaller@0
    displayName: NuGet Install X++ Packages
    inputs:
    solution: ${{ parameters.nugetConfigsPath }}\packages.config
    nugetConfigPath: ${{ parameters.nugetConfigsPath }}\nuget.config
    restoreMode: install
    nuGetRestoreArgs: -ExcludeVersion -OutputDirectory "$(NugetsPath)"

- task: XppUpdateModelVersion@0
    displayName: Update Model Version

- task: VSBuild@1
    displayName: Build X++ Model
    inputs:
    configuration: ${{ parameters.configuration }}
    solution: ${{ parameters.xppModelSolution }}
    msbuildArgs: /restore /p:BuildTasksDirectory="$(NugetsPath)\$(ToolsPackage)\DevAlm" /p:MetadataDirectory="${{ parameters.metadataPath }}" /p:FrameworkDirectory="$(NuGetsPath)\$(ToolsPackage)" /p:ReferenceFolder="$(NuGetsPath)\$(PlatPackage)\ref\net40;$(NuGetsPath)\$(AppPackage)\ref\net40;$(NuGetsPath)\$(AppSuitePackage)\ref\net40;${{ parameters.metadataPath }};$(Build.BinariesDirectory)" /p:ReferencePath="$(NuGetsPath)\$(ToolsPackage)" /p:OutputDirectory="$(Build.BinariesDirectory)"

- task: CopyFiles@2
    displayName: 'Copy X++ Compile Log Files for Artifact Publishing'
    inputs:
    SourceFolder: $(Build.SourcesDirectory)
    Contents: |
        **\Dynamics.AX.*.xppc.*
        **\Dynamics.AX.*.labelc.*
        **\Dynamics.AX.*.reportsc.*
    TargetFolder: $(Build.ArtifactStagingDirectory)\Logs\${{ parameters.configuration }}\
    condition: and(succeeded(), eq('${{ parameters.package }}', 'true'))

- task: XppCreatePackage@0
    displayName: Create Deployable Package
    inputs:
    XppToolsPath: $(NuGetsPath)\$(ToolsPackage)
    XppBinariesPath: $(Build.BinariesDirectory)
    XppBinariesSearch: '*'
    DeployablePackagePath: $(Build.ArtifactStagingDirectory)\AXDeployableRuntime_$(Build.BuildNumber)-${{ parameters.configuration }}.zip
    condition: and(succeeded(), eq('${{ parameters.package }}', 'true'))

- task: PublishBuildArtifacts@1
    displayName: 'Publish Artifacts'
    inputs:
    PathtoPublish: '$(Build.ArtifactStagingDirectory)'
    condition: and(succeeded(), eq('${{ parameters.package }}', 'true'))
Azure-pipeline-xpp.yaml
Description: Triggered by changes to the target branch. Collects X++ build-relevant details such as the Visual Studio solution and the location of the X++ metadata and AZDO artifact feed. Passes these details through to a job, which performs the actual model compilation and, optionally, packages the results.
Contents:
# Name must be in #.#.#.# format for X++ tasks
name: $(Date:yy.MM.dd)$(Rev:.r)

trigger:
- main

pool:
name: Azure Pipelines
vmImage: 'windows-2022'
demands:s
    - msbuild
    - visualstudio

variables:
MetadataPath: '$(Build.SourcesDirectory)\src\xplusplus\Models'
NugetConfigsPath: '$(Build.SourcesDirectory)\src\xplusplus\XppBuild'
XppModelSolution: 'src/xplusplus/xppBuild/<your solution name here>.sln'

stages:

- stage: buildxppmodel
displayName: 'Build XPP Model'
dependsOn: []
jobs:

- template: templates/jobs-xpp-build.yaml
    parameters:
    jobName: 'buildxppallmodels'
    displayName: 'Build X++ All Models'
    xppModelSolution: '$(XppModelSolution)'
    metadataPath: '$(MetadataPath)'
    nugetConfigsPath: '$(NugetConfigsPath)'

- template: templates/jobs-xpp-build.yaml
    parameters:
    jobName: 'buildxppdeploymentpackage'
    displayName: 'Build X++ Deployment Package'
    xppModelSolution: '$(XppModelSolution)'
    metadataPath: '$(MetadataPath)'
    nugetConfigsPath: '$(NugetConfigsPath)'
    configuration: 'release'
    package: 'true'
Summary
This document outlined the basics of setting up an X++ repository in Git and a YAML-based build pipeline that executes against this repository.